Road Conditions Event
A road condition event is to indicate to operators and motorists adverse conditions regarding specific road segments. They can unscheduled or scheduled in advance.

Create a Road Conditions Event
To create and manage a road conditions event, add the event using the map or the Action Panel, as described in Add an Event section above.
Schedule Road Conditions Event
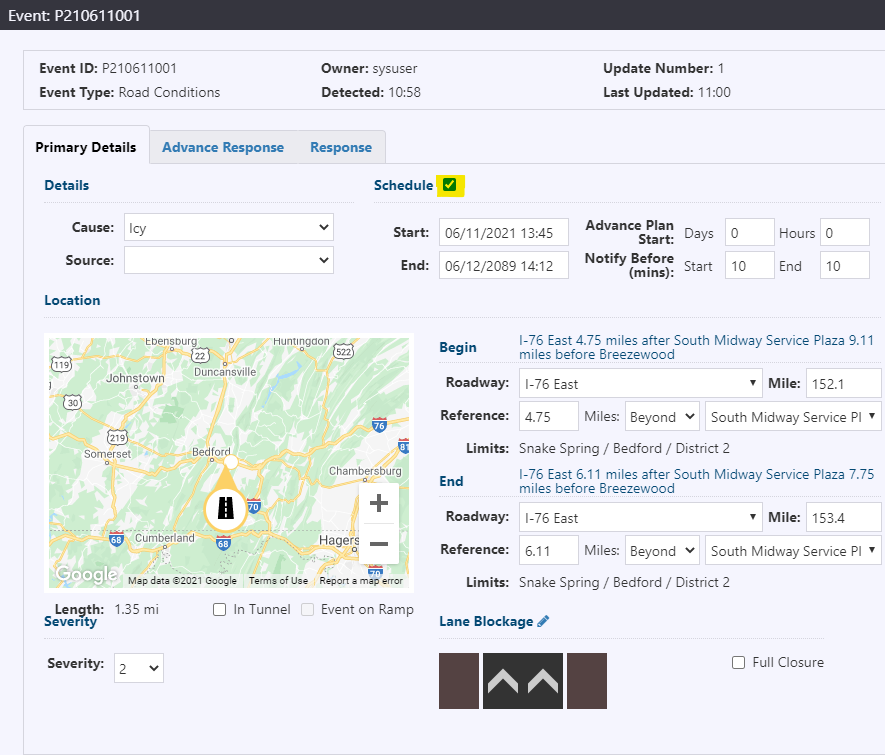
If the event is anticipated in the future, first create the event, then check the schedule checkbox. Fill in the schedule information as detailed in section Schedule an Event above.

Activating a scheduled Road Conditions Event
At the start of the event activation period or within the advance notification period (see Notify Before ), the Road Conditions Event icon will flash on the map and a high priority notification will be generated in the notification tray. The event can be activated three ways:
Click Activate in the Event Details window of the road conditions event. Activate Event confirmation dialogue will appear. Click Continue to activate event.
Response plan will be generated and available for posting, as indicated by a blue banner in the Event Details window and a notification in the notification panel. For more information on response plans, see section Manage Event Response Plan.
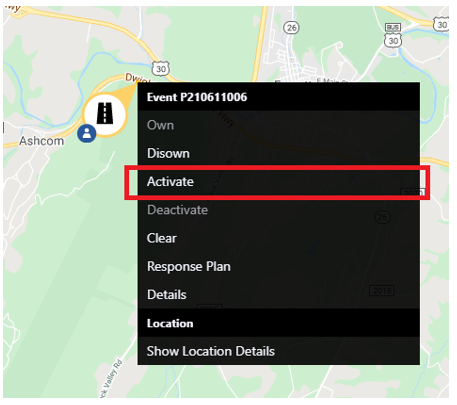
Navigate to the event icon via the map controls or through event list. Right-click event icon and click Activate.

Activate Event confirmation dialogue will appear. Click Continue to activate event.
Response plan will be generated and available for posting, as indicated by a blue banner in the Event Details window and a notification in the notification panel. For more information on response plans, see section Manage Event Response Plan.
View the notification of the event start in the notification panel:
Click View Event to navigate to the Event Details view. Event can be activated through the Event Details window, as stated above.
Click View List to navigate to the event list containing the event. Event Details window can be accessed via the list. For more information on event lists, see section View a List of Events . Event can be activated through the Event Details window, as stated above.
Click
to zoom to the weather event icon on the map. Event can be activated through the Event Details window or right-clicking on the icon, as stated above.
Activate Event confirmation dialogue will appear. Click Continue to activate event. The notification requesting event activation will be removed from the tray.
Active response plan will be generated and available for posting, as indicated by a blue banner in the Event Details window and a notification in the notification panel. For more information on response plans, see section Manage Event Response Plan.
Deactivating a scheduled Road Conditions Event
At the end of the event activation period or within the advance notification period (see Notify Before ), the weather event icon will flash on the map and a high priority notification will be generated in the notification tray. The event can be deactivated three ways:
Click Deactivate in the Event Details window of the road conditions event. Deactivate Event confirmation dialogue will appear. Click Continue to deactivate event.

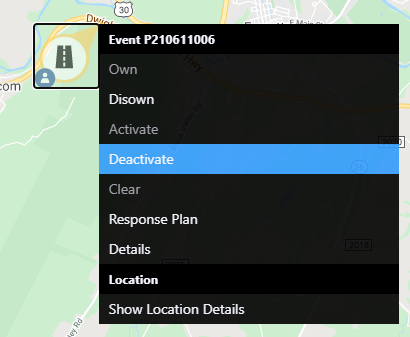
Navigate to the event icon via the map controls or through event list. Right-click event icon and click Deactivate.

Deactivate Event confirmation dialogue will appear. Click Continue to deactivate event.
View the notification of the event end in the notification panel:
- Click View Event to navigate to the Event Details view. Event can be deactivated through the Event Details window, as stated above.
- Click View List to navigate to the event list containing the event. Event Details window can be accessed via the list. For more information on event lists, see section View a List of Events . Event can be deactivated through the Event Details window, as stated above.
- Click
to zoom to the weather event icon on the map. Event can be deactivated through the Event Details window or right-clicking on the icon, as stated above.
Deactivate Event confirmation dialogue will appear. Click Continue to deactivate event. The notification requesting event deactivation will be removed from the tray.
Deactivating the event will clear the response to devices and there will be no text-based response generated. For more information on response, see section Manage Event Response Plan.
For more information on system notifications, see section Notifications.
Clearing a Road Conditions Event
Road conditions event can be cleared from the map by either clicking Clear through the Event Details window or right-clicking the event icon, as described in section Clear an Event