Manage Event Response Plan
A Response Plan is a set of messages and actions that the ATMS suggests should be sent/taken to notify the public, responders and other stakeholders about an event or set of combined events. The response plan is generated based on configured rules and templates.
Response plans can include messages and activation instructions for ITS assets such as:
- DMS
- HAR
- HAR beacons/flashers
Response plans also includes messages for electronic dissemination via:
- SMS
- API (publishes the event through a REST API that external systems can access)
Response plans may also include a set of contacts to be made by phone or radio.
Response plans are generated when events are added, updated and cleared. Unplanned events have a single response plan that is accessed from the Response tab of the Event Details view. Planned events and forecast weather events may have two response plans that are accessed through the Advance Plan and Active Plan tabs of the Event Details view.
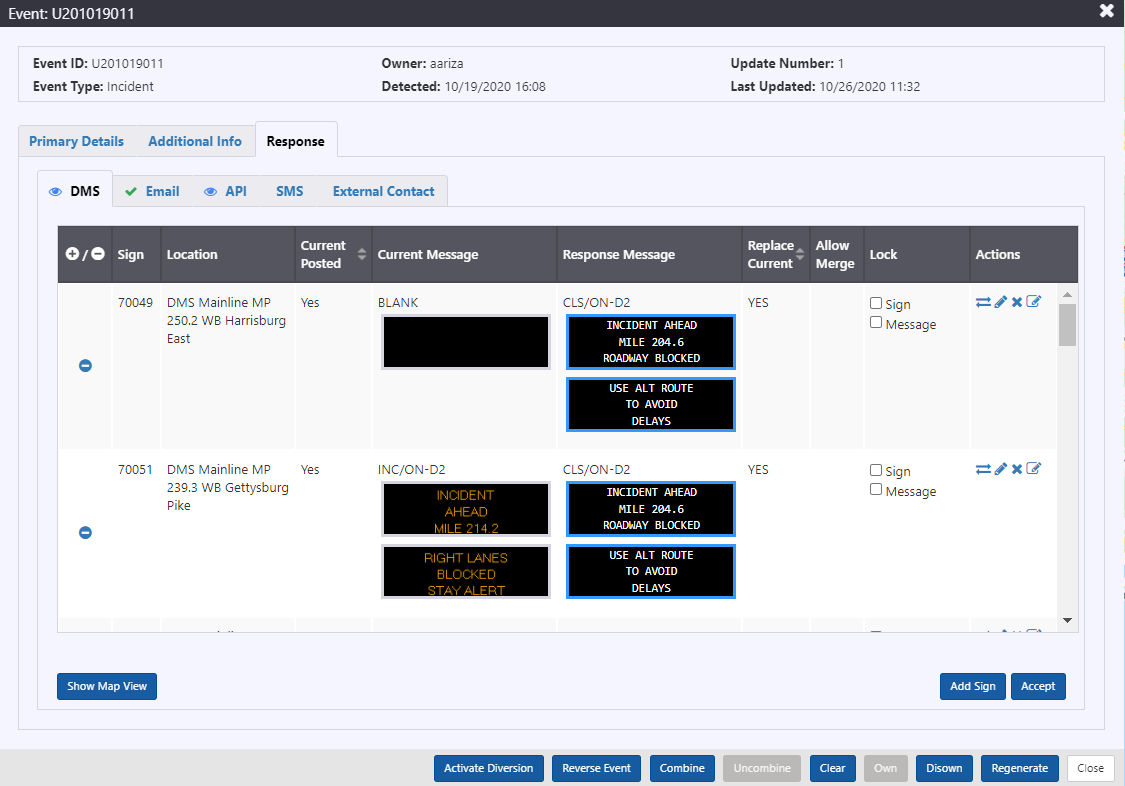
Response Tabs
Each part of the response plan is presented using a tab. The name of the tab refers to the device or broadcast medium used to disseminate the response messages.
The response sub-tabs convey the state of response review at a glance.
| TAB STATE | DESCRIPTION |
|---|---|
| The contents of the tab have not been viewed | |
| The contents of the tab have been viewed, but not accepted | |
| The contents of the tab have been viewed and accepted. Accepting a portion of the response plan triggers a broadcast of the messages or event information through the specified medium. | |
| The response in the tab is available for review and modification but cannot be activated based on the schedule or state of the event. This is applicable only for Planned and Weather event response. |
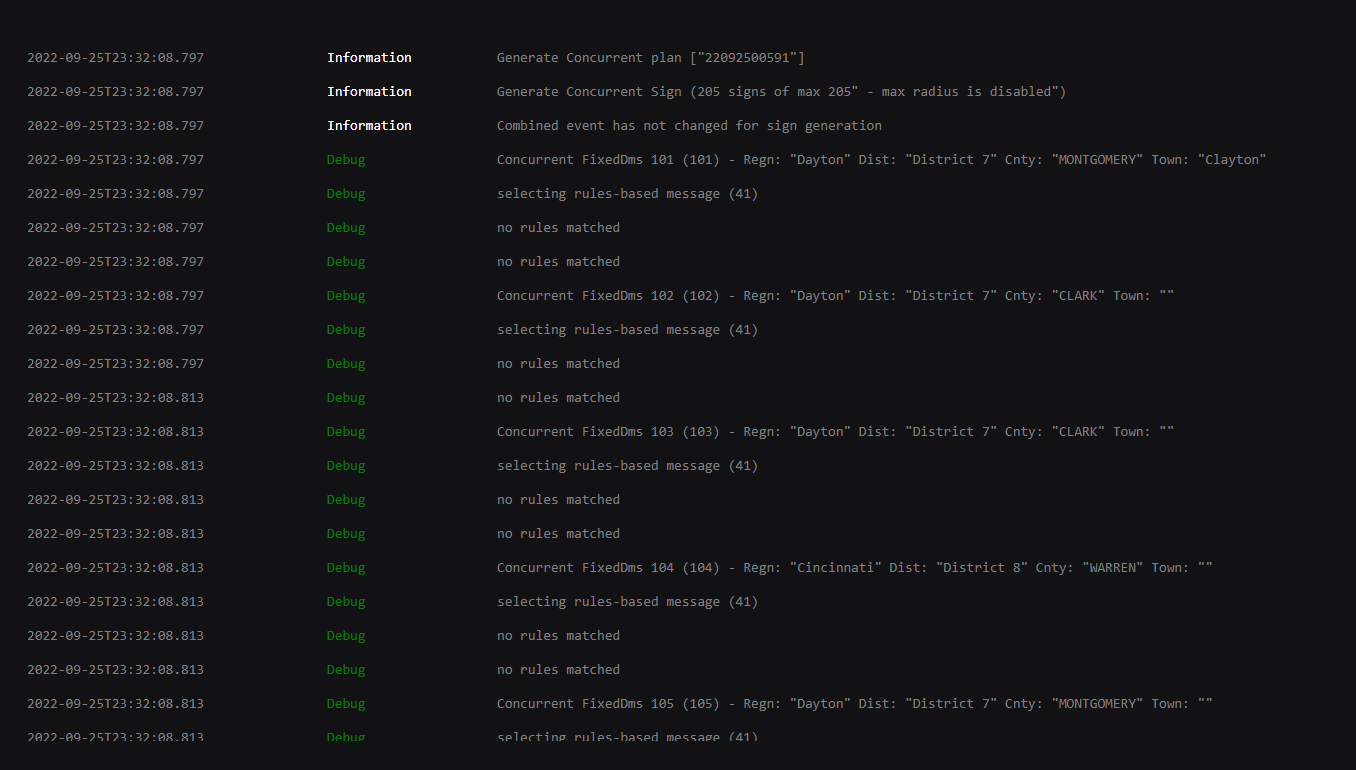
View Generation Log
Click on View Generation Log to view the log.

A new window opens with the log details such as timestamp, and information.
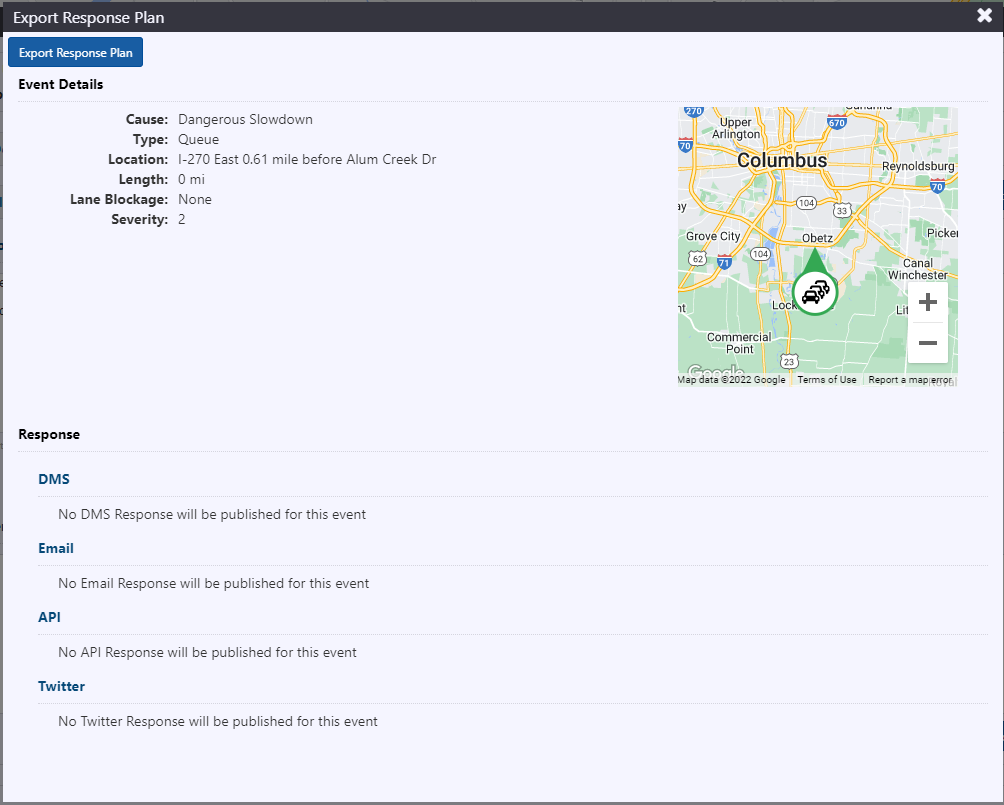
Export Response Plan
Click on Export Response Plan to view the log.

A new window opens with the log details such as Event Details and Response details.
DMS Response
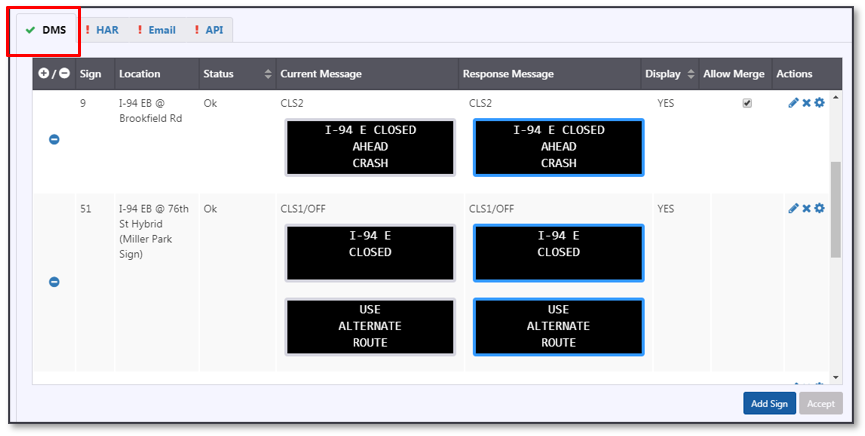
The DMS response tab indicates which signs are currently part of the response plan, and the message that will be sent to each sign if you Accept the DMS portion of the plan.
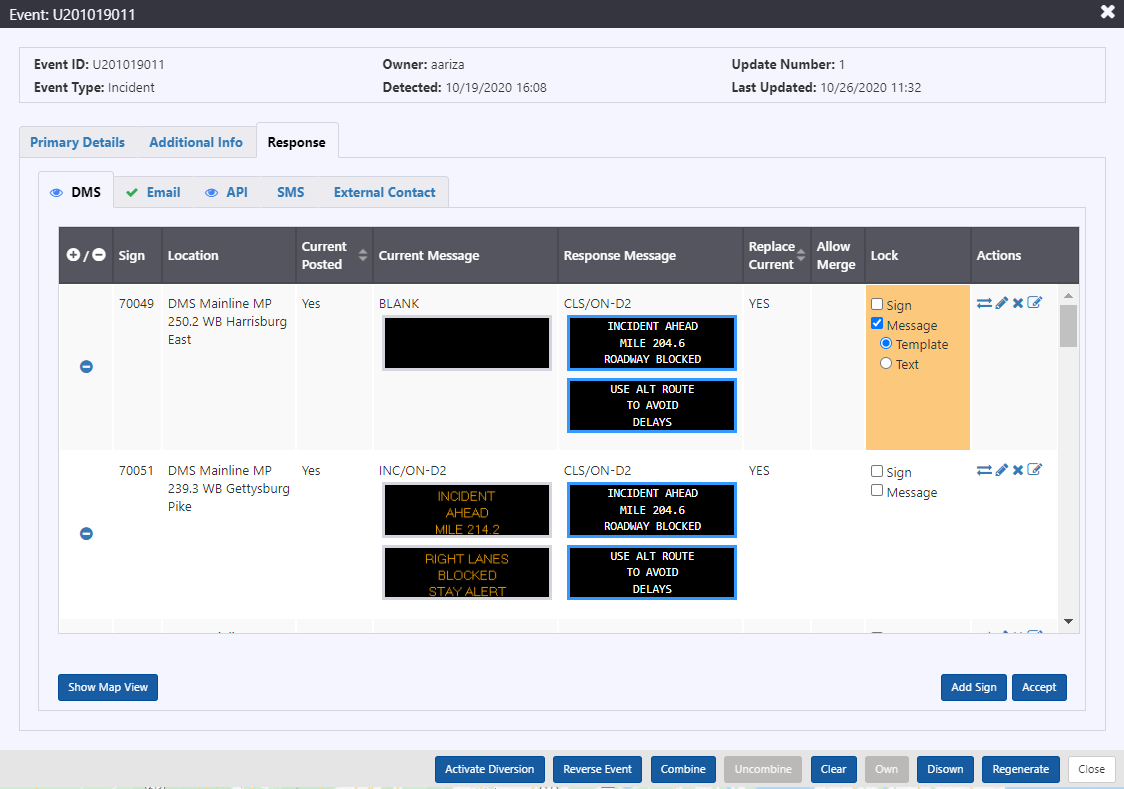
The table for suggested DMS response tab contains the following columns:
+/-: toggle to collapse or expand each row of the table
Sign: sign ID
Location: location of the sign
Current Posted: indication of whether the Current Message is being posted to the DMS
Current Message: currently posted message on the sign, including the name of the message. A blue border indicates that this message is higher priority than the message included in the response plan and will remain on the sign.
Response Message: suggested or selected message for the event, including the name of the message. A blue message border indicates that the message will be posted to sign as the highest priority message.
Replace Current: indication of whether the message will be posted to the sign as the highest priority message.
Allow Merge: toggle to indicate whether this message should be allowed to merge with other messages in the sign queue. For more information on message merging, see section Message Merging .
Lock Sign: if checked, the sign will remain in the response plan when the response is regenerated.
Lock Message: if checked, the response message will remain on the selected sign when the response is regenerated. Locking message provides two options:
- Lock template: the message template will remain, but message details will be updated if the response plan changes. This option is only available for template-generated messages.
- Lock text: the exact text will remain, regardless of event details changing.
Actions:
allows you swap out the suggested message with a message from the sign's library or other suggested response messages. Click to view the list of alternative messages. To select a message from the list, click anywhere in the row and click Select.
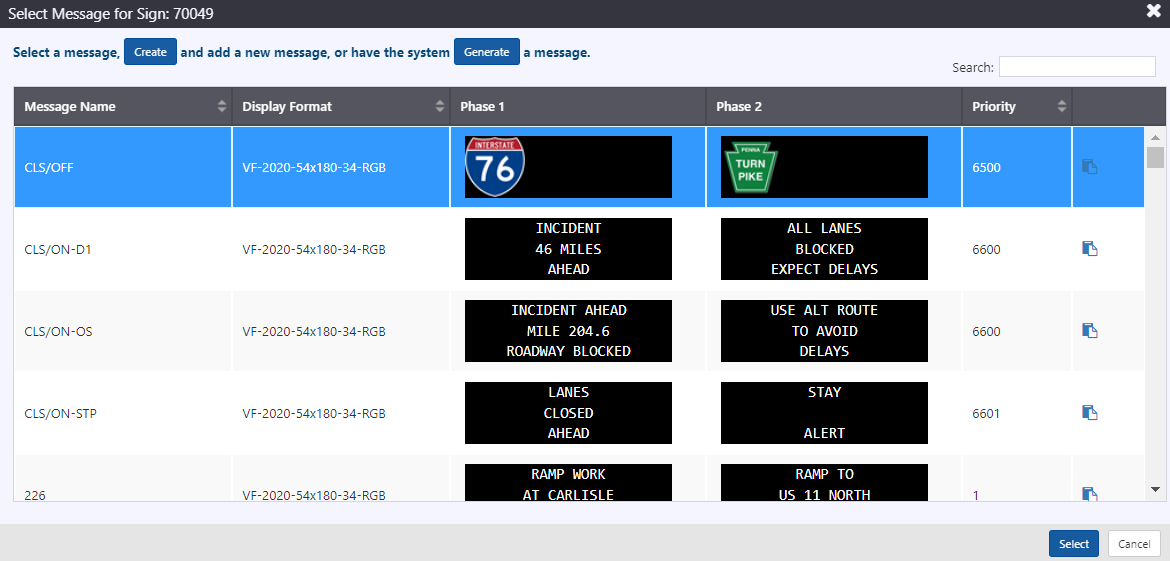
The DMS response tab will update to include the new message.
If you are looking for message that does not exist in this list, click Create to open a message editor and create a new message. If you wish to edit use an existing message as a starting point, and edit it to suit the current event, click the
to open a message editor for the selected message. In either case, the message included in the response plan will be updated.
-  opens a message editor and allows you to edit the response message
-  allows you to remove the sign from the response plan.
-  opens the sign's Properties window, as discussed in section [ Manage A Sign ](/docs/Mesaging%20Devices/dms#manage-a-sign). This can be used to remove a higher priority message from the sign and allow the response message to be posted
Add a Sign
To add a sign that should be included in the plan, but was not suggested by the system, click Add Sign at the bottom of the tab.
You will be presented with a list of signs. Search for the sign using Search box or scroll through the list. Select the sign by clicking anywhere in its row of the list and click Select.
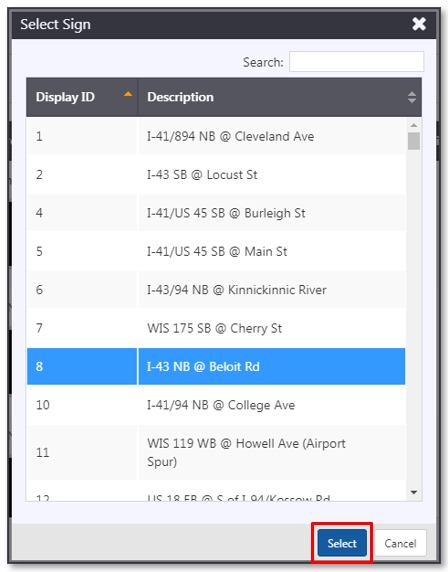
The ATMS will display a list of messages that can be selected for the sign. These include template messages populated with event details as well as messages from the sign's message library. Search for a message using Search box or scroll through the list.
To select an existing message, click anywhere in the row of the message and click Select.
To create a new message to include in the response plan, click Create. This will open up a message editor for the sign. Fill in the message text and/or graphics and message name, optionally save the message to the library and click Add to Plan.
To create a new message from a copy of an existing message click . This will open up a message editor pre-populated with the text and graphics of the selected message. Edit the message text and/or graphics and click Add to Plan.
In all cases, the new sign and message are added to the response plan.
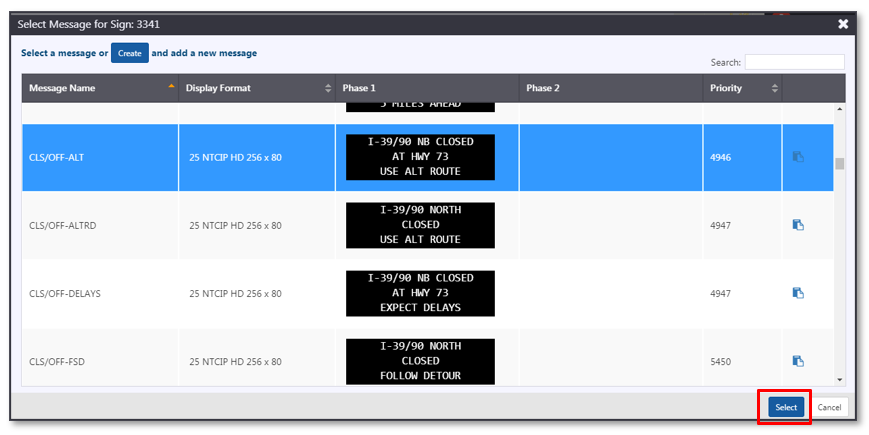
The DMS response tab will update to include the new message.
If you are looking for message that does not exist in this list, navigate to the sign's Properties window and add the message to its library, as described in section Manage the Message Library . This list will update to include the message.
Accept Response
If you are satisfied with the DMS response in the tab, click Accept at the bottom of the tab.
The DMS tab status will visually indicate that the response has been submitted. The ATMS will update the message queue for each sign that is part of the response plan with the specified Response Message. If the new message is the highest priority message in the queue, or should merge with the highest priority message, the ATMS will post the new message to the sign. The Current Message will update for those signs where the response message has been posted.
Remove Response
Response messages sent to DMS will be automatically removed from the signs when the event is cleared, or a planned event occurrence has been deactivated.
To remove a response message from a sign prior to event clearance or occurrence deactivation, click the button. Click Accept to implement the new DMS response and trigger the ATMS to remove messages from the queue(s) of the removed sign(s).
Map View
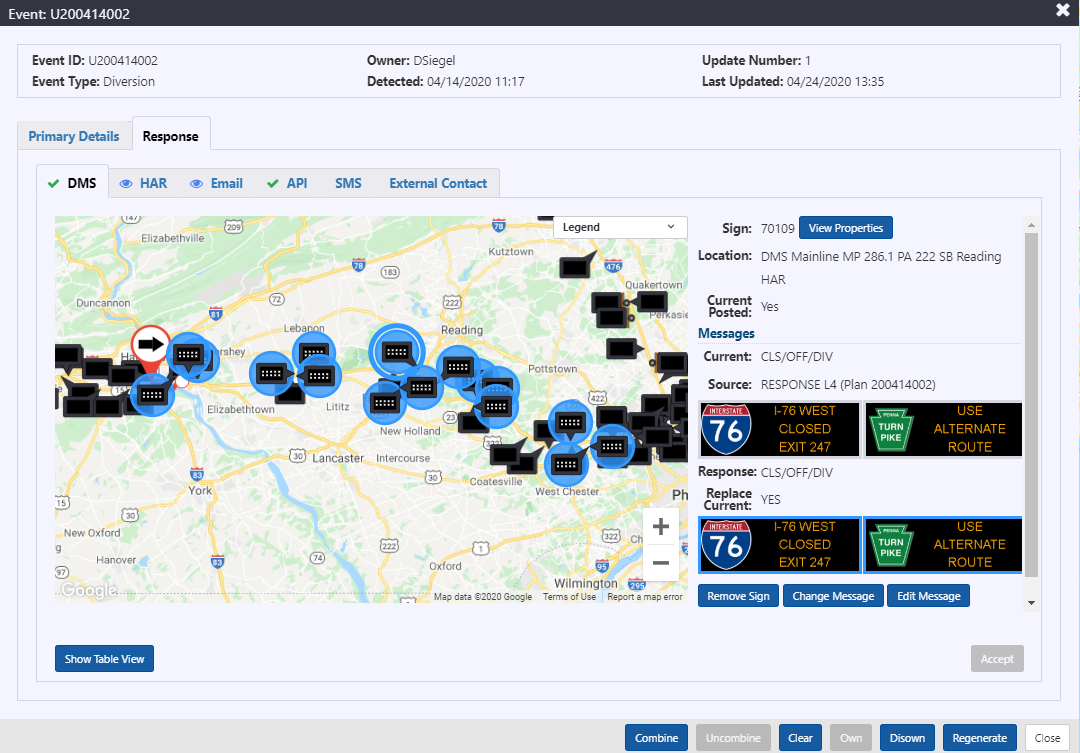
The Map View provides the same functionality as Table View while displaying sign locations. Click on a sign in the map to view and edit its properties on the right side of the window.
- View Properties: has the same functionality as the
button in the Table View
- Remove Sign: has the same functionality as the
button in the Table View
- Change Message: has the same functionality as the
button in the Table View
- Edit Message: has the same functionality as the
button in the Table View
HAR Response
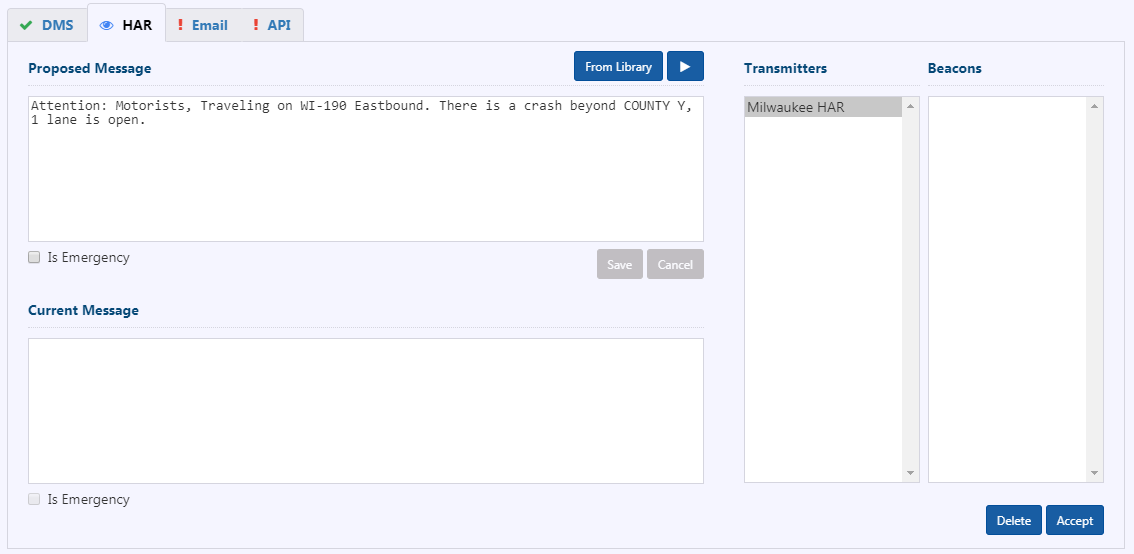
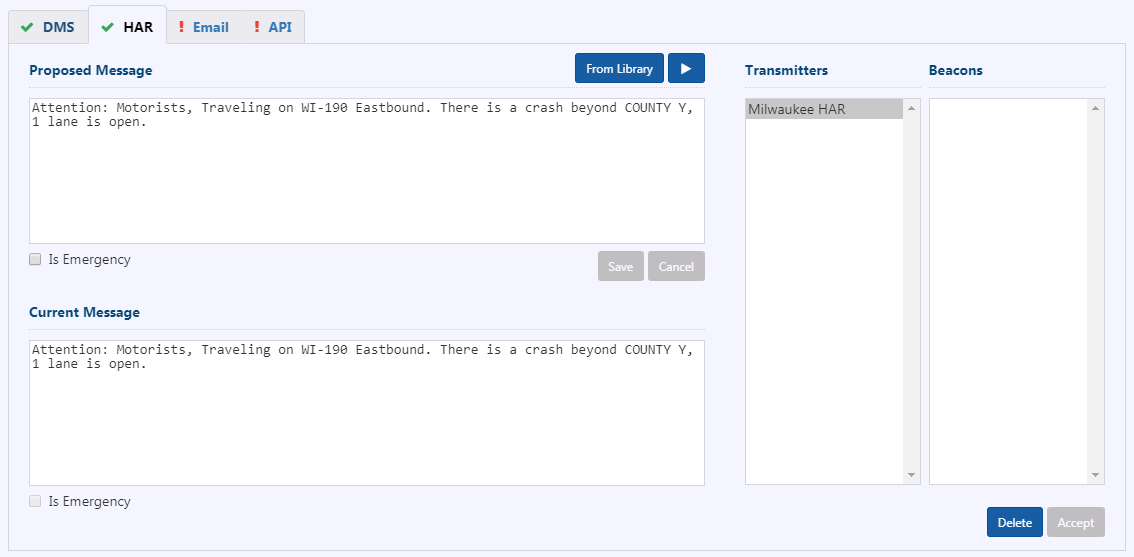
The HAR Response tab indicates the text of the Proposed Message to broadcast for the event, along with the Transmitters that will receive the message, and the Beacons that should be activated to indicate a message is being broadcast on the transmitters.
Change the HAR Response
To edit the proposed message, click in the Proposed Message text area, modify the text as desired and click Save.
To replace the proposed message with a message from the HAR Message Library, click From Library. The ATMS will open the HAR Message Library. Select a message by clicking anywhere on its row in the list, the text of that message will be displayed at the bottom of the library view. To preview the audio of the message, click the button. Click Set Message to use the selected message in the response plan.
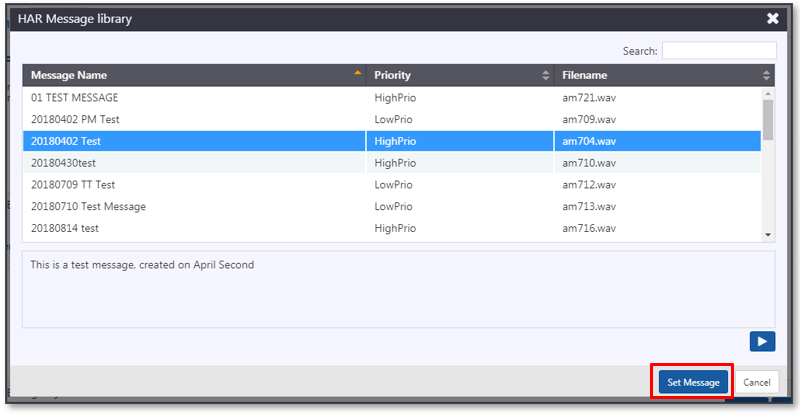
The Proposed Message in the HAR response tab will update to show the library message. For more information on the HAR library, see section 0.
Preview the Proposed Message
To preview the audio of the proposed message, click the button above the text area.
Change Selected Transmitters
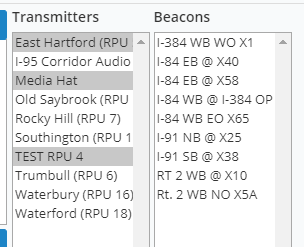
Click on the transmitter names to toggle on or off their inclusion in the response plan. The ATMS will highlight the selected transmitters.
Send Message to Transmitters
To send the proposed message to the selected transmitters, click Accept. The ATMS will add the proposed message to the playlist for all selected transmitters, and trigger activation of all of the required beacons. If a transmitter was included in an earlier response message for this event, and is no longer selected, the ATMS will remove the message related to this event from its playlist automatically. The Current Message area will update to show the accepted HAR message.
Remove Response
To remove the response message from one or more, but not all, transmitters included in the event response, unselect the transmitters from which the message should be removed and click Accept.
To remove the response message from all transmitters included in the event response, click Delete to clear the Proposed response message, and then click Accept. Note that all messages related to the event will automatically be removed from transmitter playlists when the event is cleared.
Email Response
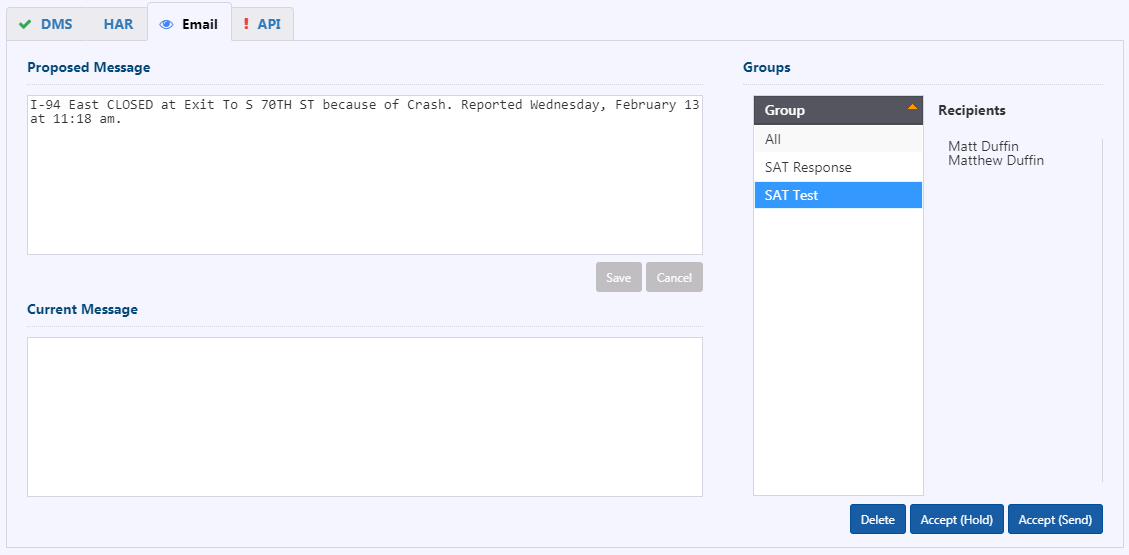
The Email Response tab indicates the text of the Proposed Message to send via e-mail for the event, along with the Broadcast Groups to which the message will be sent, and the individual recipients that will receive it.
Edit the Email Response
To edit the email response, click on icon in the Proposed Message box. A new box is opened with Generated Text and Supplemental Text.
Modify the text as needed and click Save.
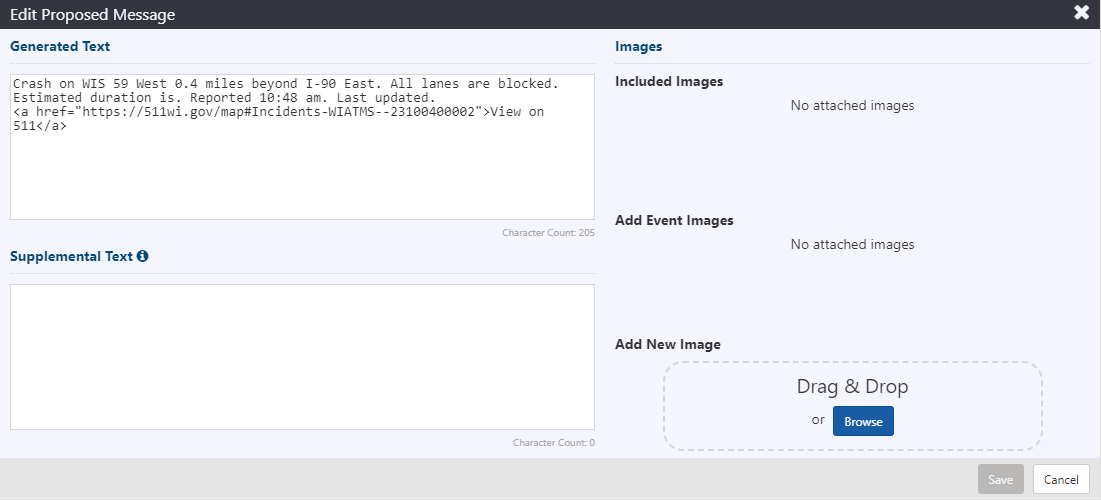
Update the text as needed in Supplemental Text area. It is an option to add images that will be sent as attachments as well. Click Save. A message will be displayed saying that "Supplemental Text included in message."
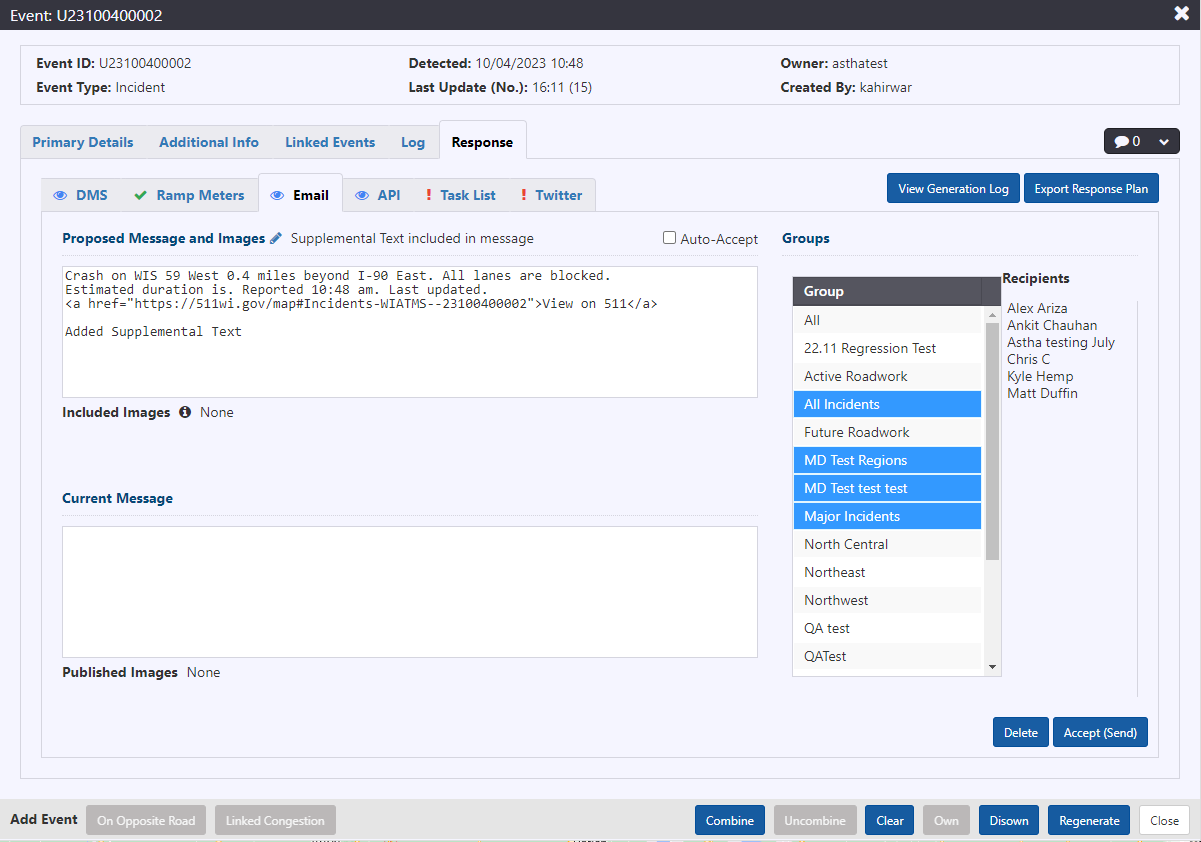
If images are attached to the Email Response.
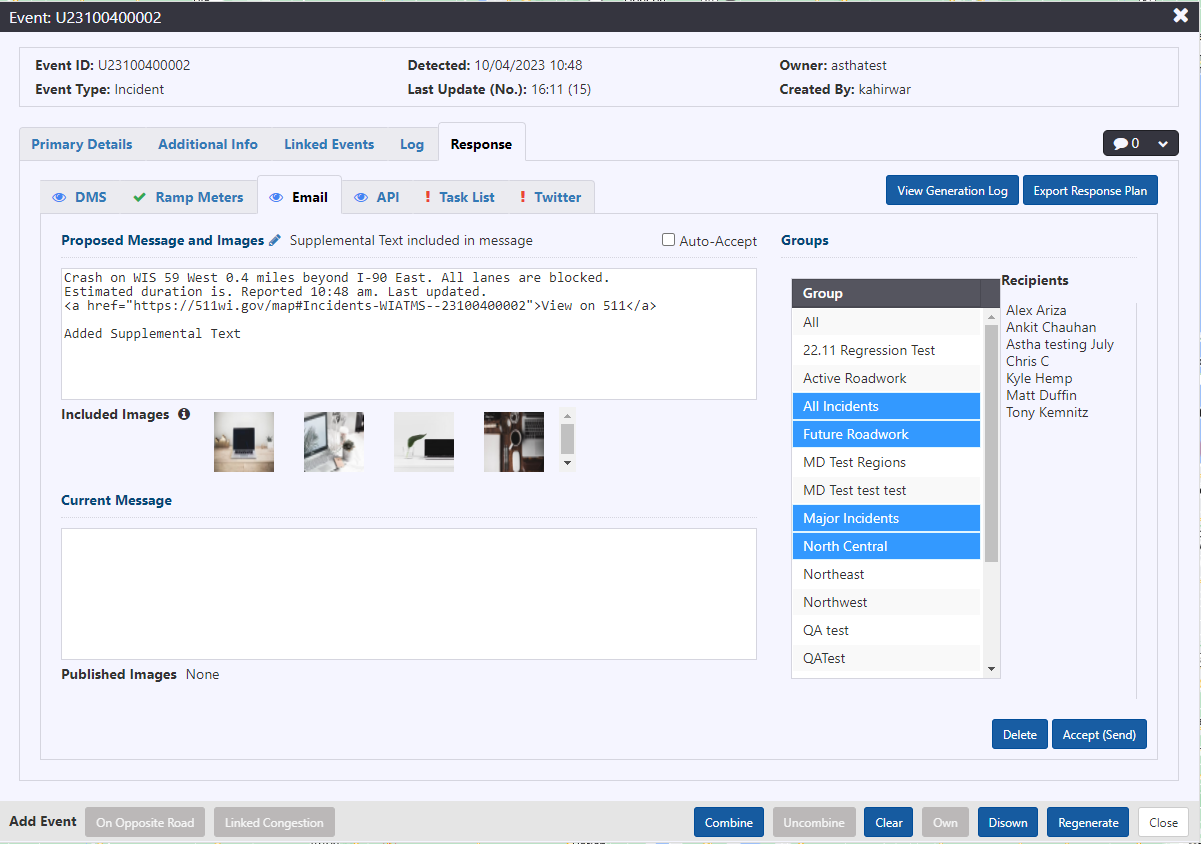
Select or Change Email Recipients
Click on the Group names to select or unselect broadcast groups that should receive the response message. The ATMS will update the set of recipients for the message based on the selected groups. The selected groups are highlighted.
Send the Email Response
To send the e-mail response immediately click Accept (Send). This will trigger an e-mail to all recipients that are part of the selected groups.
To accept the response but have it wait to be part of a batch update, click Accept (Hold). The e-mail response for this event will be included in e-mails sent the next time you or another user clicks Accept (Send) for any event (including the current). This functionality is typically used in cases where multiple events are being managed simultaneously in the same area, and helps to reduce the number of messages received by each recipient.
The Current Message will update to the last accepted message when you click on either of the accept options.
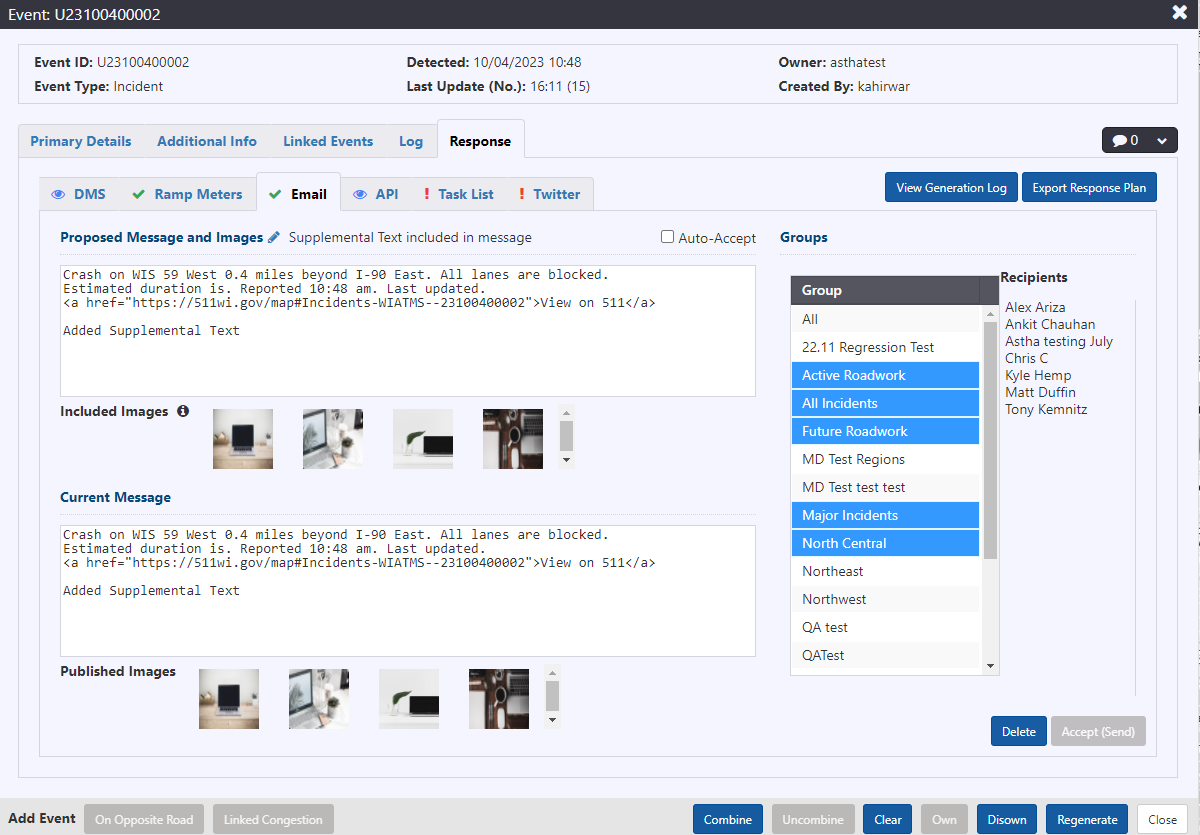
Deleting Email
To delete an email from a list of previously 'held' emails, click Delete at the bottom of the tab. Click Continue in the Delete Email Response confirmation dialogue. Proposed Message will be blank. Click Accept(Hold) to accept the removal of the Email message from the previously 'held' emails. You will no longer be able to send any emails throughout the duration of the event.
Accept(Send) will similarly remove the email from the previously 'held' emails and send an updated email will all the other 'held' emails to the recipients.
Task List
The Task List Response tab indicates the contact rules of the event in the ATMS API. When the API response element is accepted, the ATMS publishes the contact rules of the event through its API, making it available to external systems.
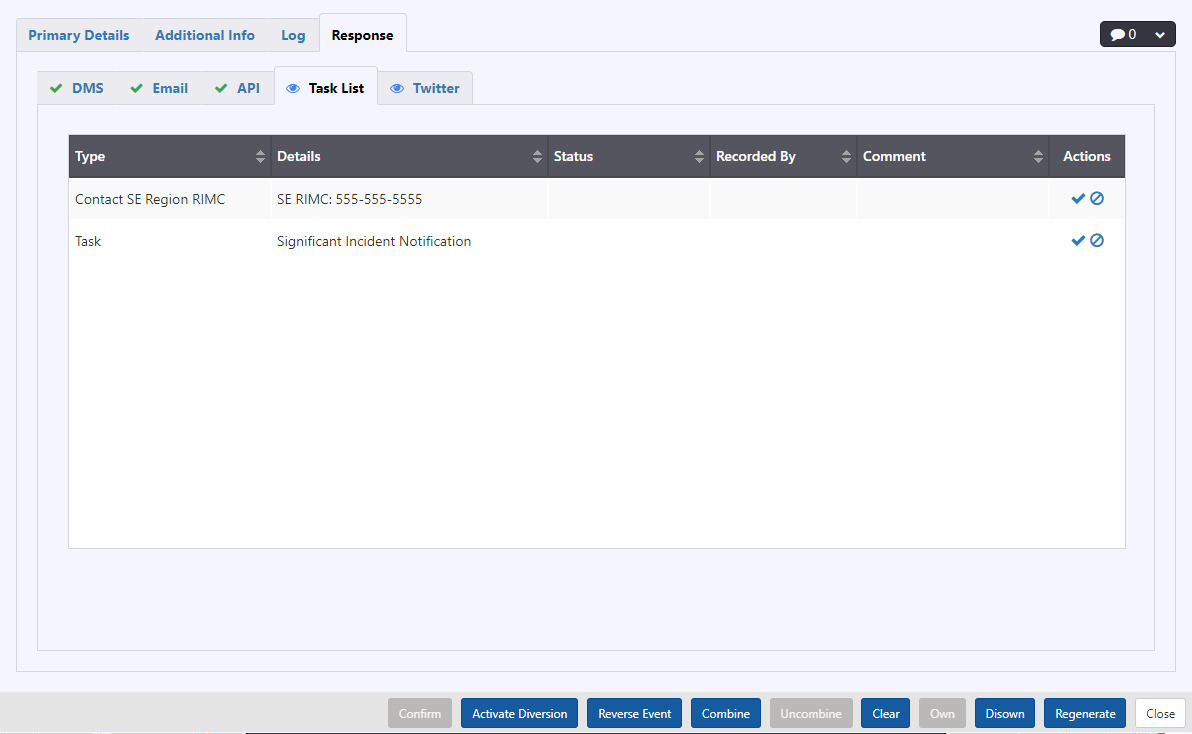
Click on to log the contact.
API Response
The API Response tab indicates the text of the Proposed Message to use as a description of the event in the ATMS API. When the API response element is accepted, the ATMS publishes the current details of the event through its API, making it available to external systems.
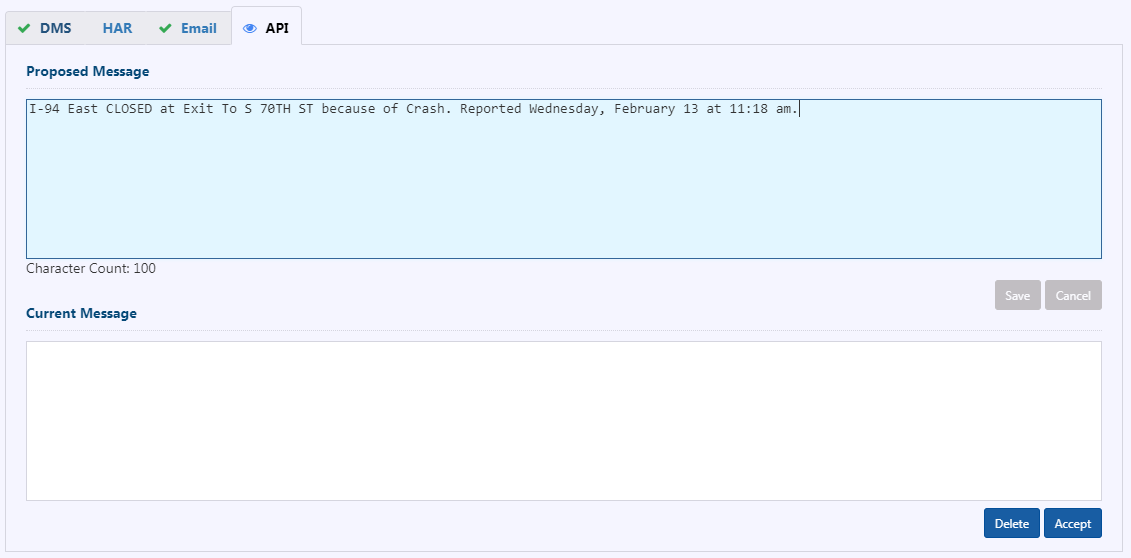
If configured, API response supports inclusion of event comments in broadcast messages.
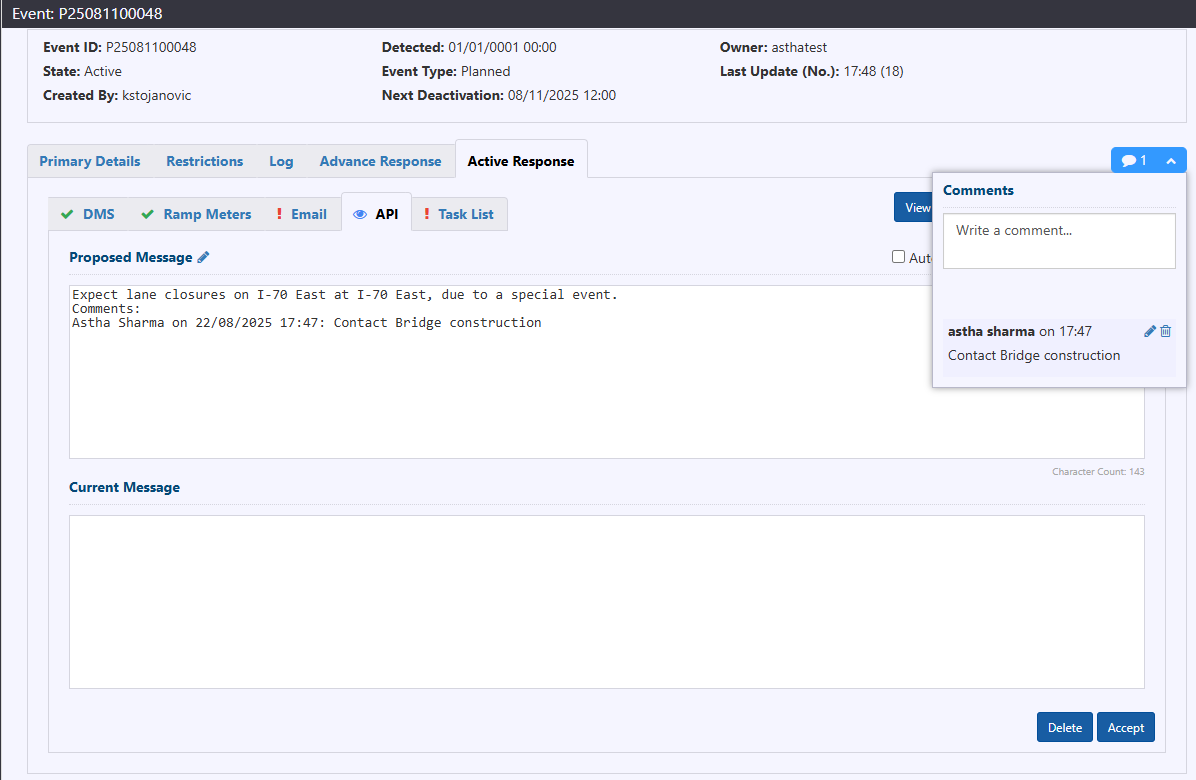
Edit the Event Description
To edit the event description that will be published through the API, click on icon in the Proposed Message box. A new box is opened with Generated Text and Supplemental Text.
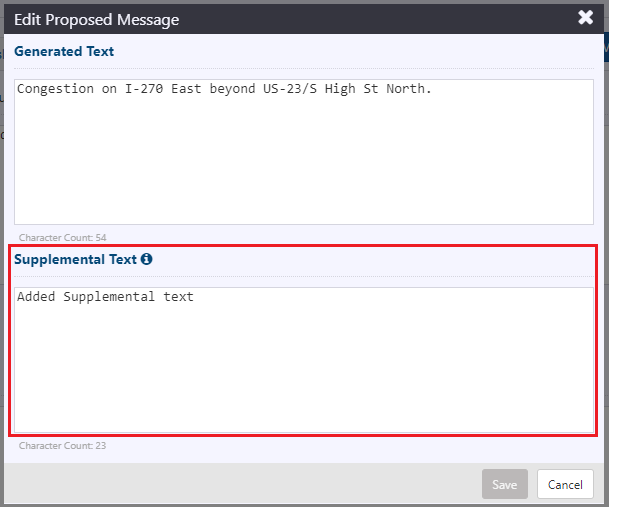
Update the text as needed in Supplemental Text area and click Save. A message will be displayed saying that "user entered Supplemental text".
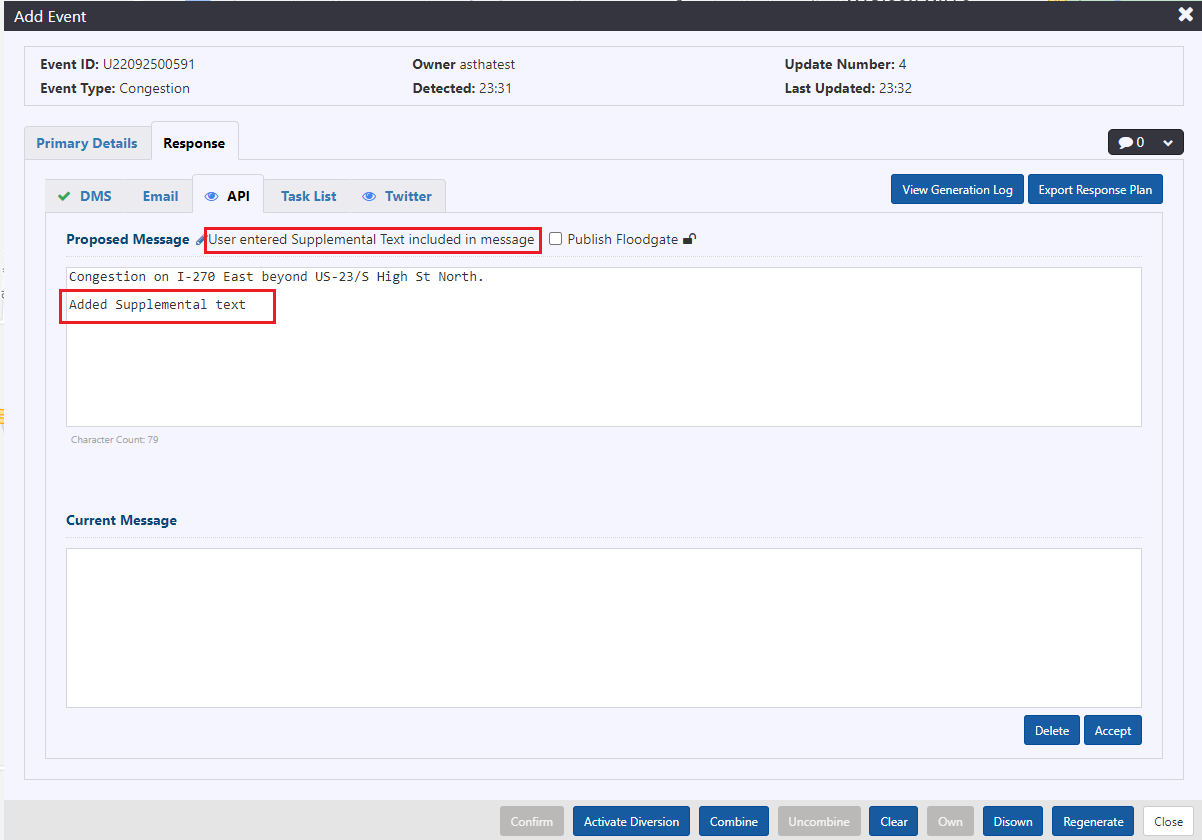
Publish the Event to the API
To make the current details of the event, and the proposed description available through the ATMS API, click Accept. The Current Message updates to show the last accepted description.
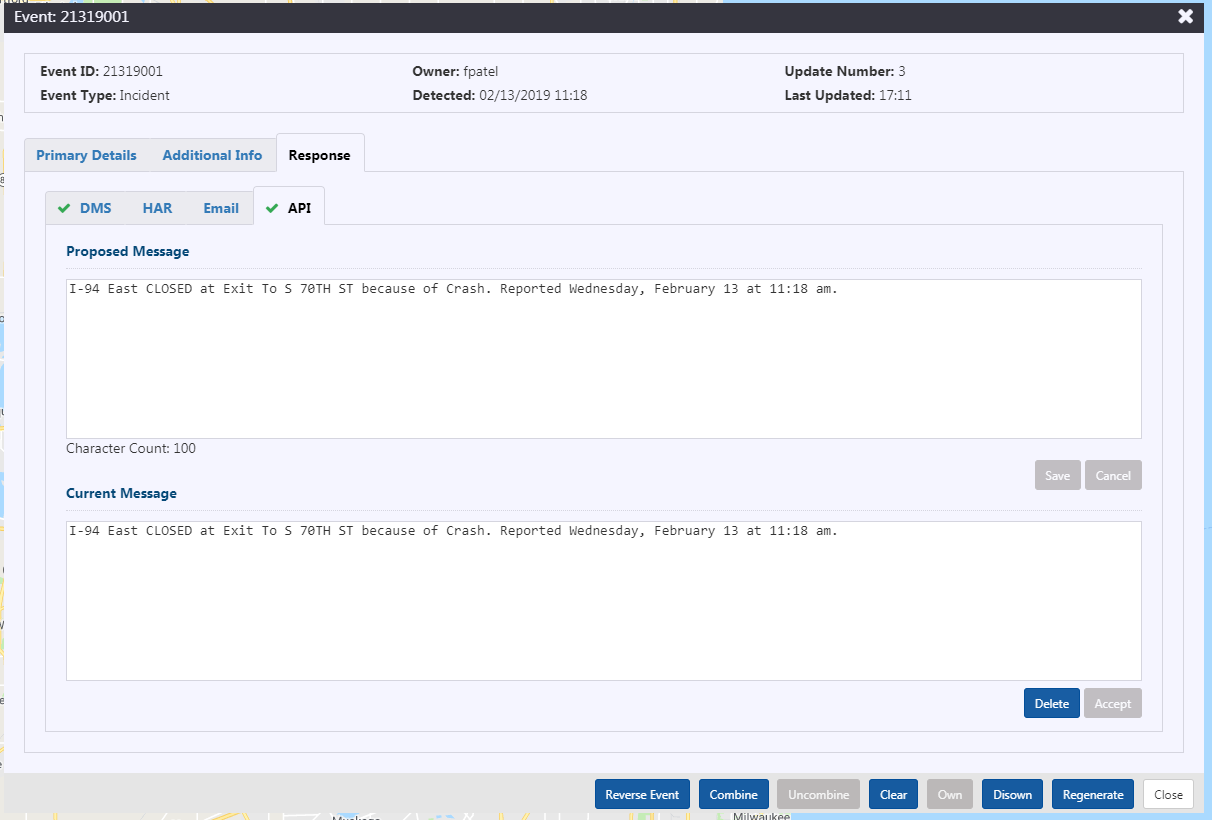
If the proposed or updated message is longer than 160 (or other system specific character limits) characters, you will get a warning similar to below.
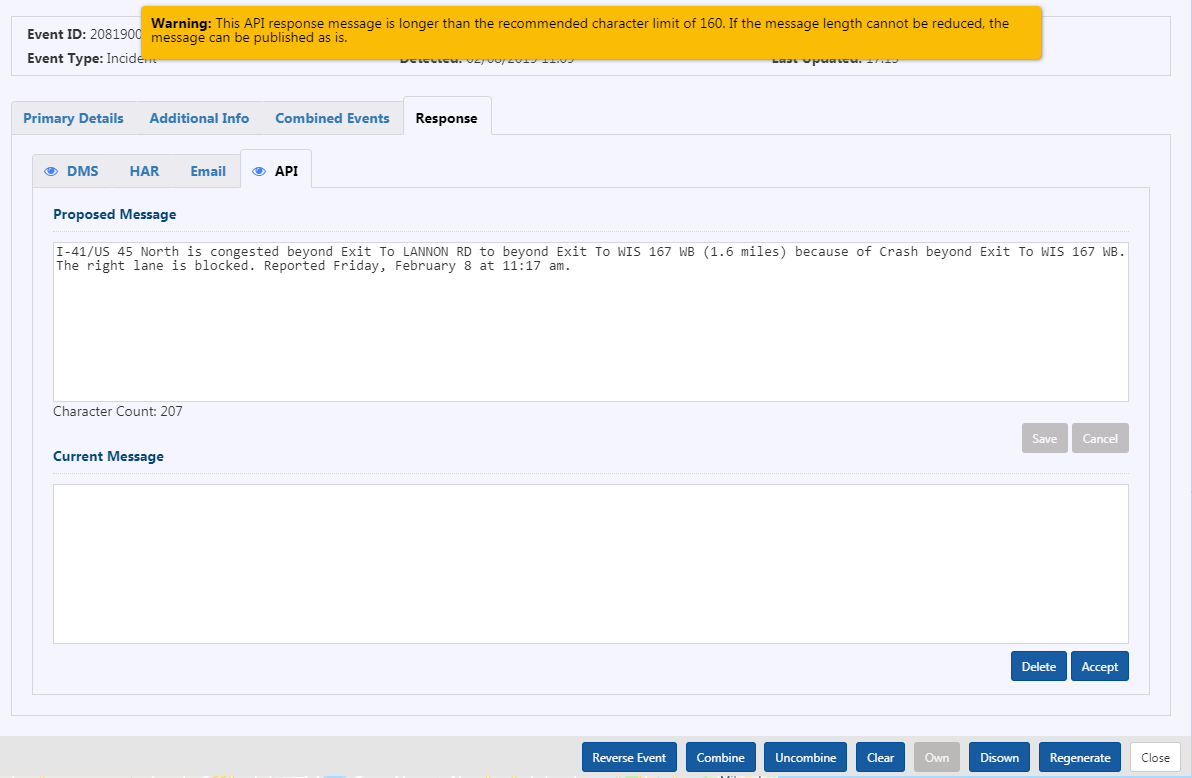
The warning is suggestion to trim the text down to or below the limit to be cognizant of certain limitations in the consuming system.
Remove an Event from the ATMS API
To remove an event from the ATMS API (it will no longer be in the feed of events made available to other systems), click Delete and then Accept.
SMS Response
The SMS Response tab indicates the text of the Proposed Message to send via SMS for the event, along with the Broadcast Groups to which the message will be sent, and the individual recipients that will receive it.
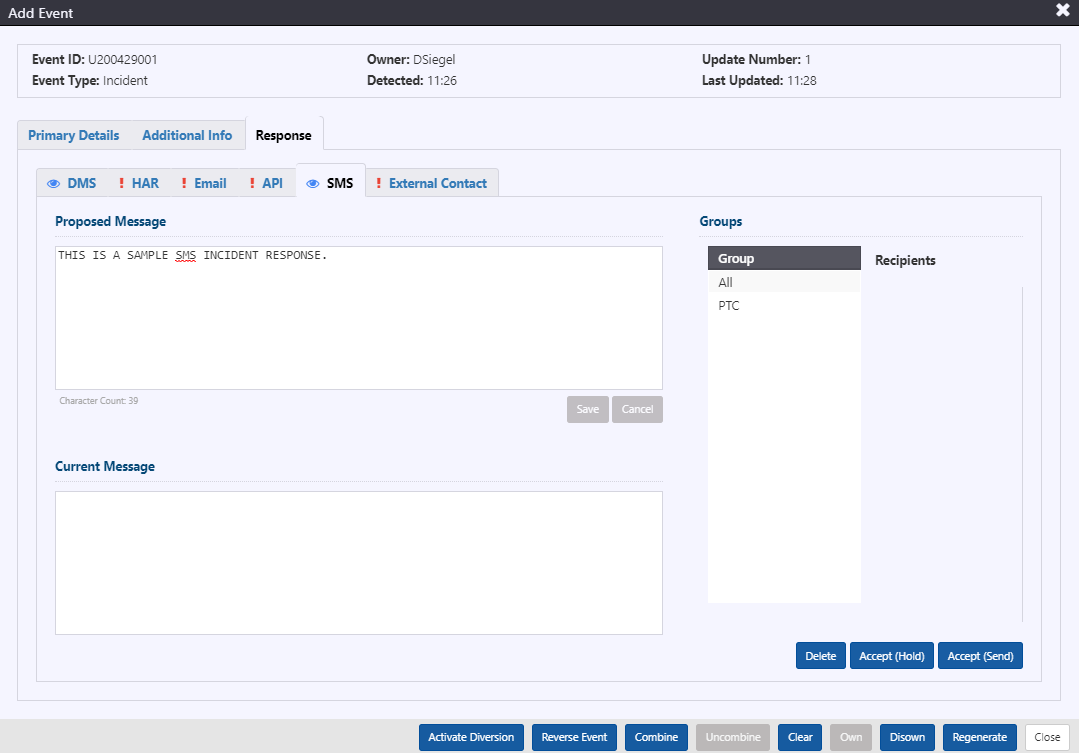
Edit the SMS Response
To edit the SMS response, click in the Proposed Message box, the background color of the box will change to blue to indicate that it is editable. Modify the text as needed and click Save.
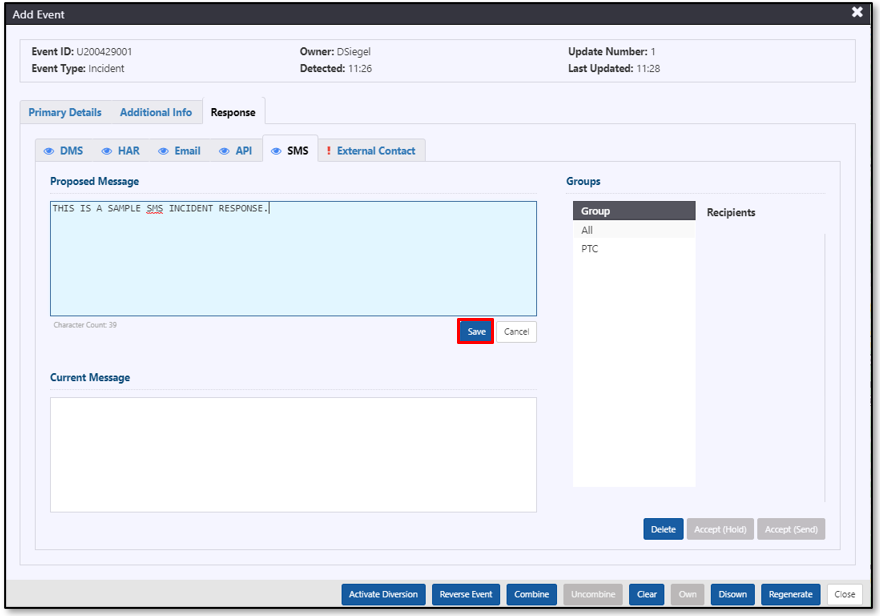
Select or Change SMS Recipients
Click on the Group names to select or unselect broadcast groups that should receive the response message. The ATMS will update the set of recipients for the message based on the selected groups. The selected groups are highlighted.
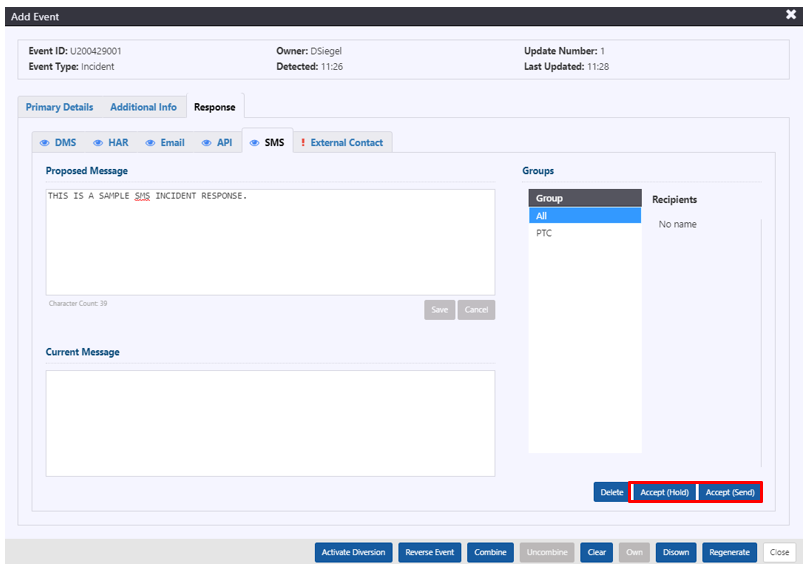
Send the SMS Response
To send the SMS response immediately click Accept (Send). This will trigger an e-mail to all recipients that are part of the selected groups.
To accept the response but have it wait to be part of a batch update, click Accept (Hold). The SMS response for this event will be included the next time you or another user clicks Accept (Send) for any event (including the current event). This functionality is typically used in cases where multiple events are being managed simultaneously in the same area and helps to reduce the number of messages received by each recipient.
The Current Message will update to the last accepted message when you click on either of the accept options.
Deleting SMS
To delete an SMS message from a list of previously 'held' emails, click Delete at the bottom of the tab. Click Continue in the Delete Email Response confirmation dialogue. Proposed Message will be blank. Click Accept (Hold) to accept the removal of the SMS message from the previously 'held' SMS messages. You will no longer be able to send any SMS messages throughout the duration of the event.
Accept (Send) will similarly remove the SMS message from the previously 'held' emails and send an updated email will all the other 'held' emails to the recipients.
Twitter Response
The Twitter Response tab indicates the text of the Proposed Message to use as a description of the event when posting to Twitter. An image can also be attached to include in the Tweet. When the Twitter response element is accepted, the ATMS publishes the current details of the event, making it available to on Twitter .
Edit the Event Description
To edit the event description that will be published through Twitter, click in the Proposed Message box, the background color of the box will change to blue to indicate that it is editable. Modify the text as needed and click Save.
Publish the Event to Twitter
To make the current details of the event, and the proposed description available through on Twitter, click Accept. The Current Message updates to show the last accepted description. A link is provided to the published Tweet.
External Contact List
The External Contact tab provides a table of the appropriate agencies to contact depending on the event created.
To record either successful contact or no response, click the buttons.
The Record Contact window will pop up with the following response options:
- Contact Time: record the date and time of attempted contact
- No Response: check this box if there was no response
- Comment: add any relevant details
Click Save to record the response. The Contacted, Recorded By, and Comment columns will be populated accordingly in the External Contact table.
The contact record can be edited by clicking the button on the right.
Response Regeneration
The ATMS will automatically generate a new response plan when major event characteristics (e.g. location, cause, lane pattern) are updated. The system may also generate a new response plan when events are cleared, if configured to do so.
Manually Regenerate a Response Plan
To manually regenerate a response plan, click Regenerate. This function may be used to generate a new plan that accounts for changes to the response plan configuration, or to return to the system recommended response when manual changes have been made.

Manage an Advance Plan
Advance Response plans can be used to notify the public and internal stakeholders about upcoming construction or maintenance events, and forecast weather conditions. To set an event to have an Advance Plan, set the Advance Plan Start to a value greater than 0 days and 0 hours.

You will be notified when an event reaches the start of its Advance Plan period. The Advance Plan can be reviewed at any time after the event is created, but cannot be accepted until the event enters its Advance Plan period.
::::note
The Notify Before (mins) does not apply to Advance Plan notification.
:::
For more information on Planned event and Weather event scheduling, see sections Planned Event and Weather Event Scheduling .
The specific devices and broadcast mediums suggested for response are the same as the ones suggested for the Active Response. What sets this response plan apart is the content, notifying the road users and other stakeholders in advance of a Planned or Weather event occurring. For more information on activating response, see sections Manage Response Plan .