Manage a Planned Event
A planned event is an event that is anticipated and has associated possible impacts on the flow of traffic that need to be managed. The iconography is as follows:
| EVENT ICON | EVENT TYPE |
|---|---|
| Planned Possible causes: road works, special events | |
| Unverifiable Event |
Schedule an Event
To manage a Planned event, first declare the event on the map, as described in section 16.1. The Event Details window is shown.
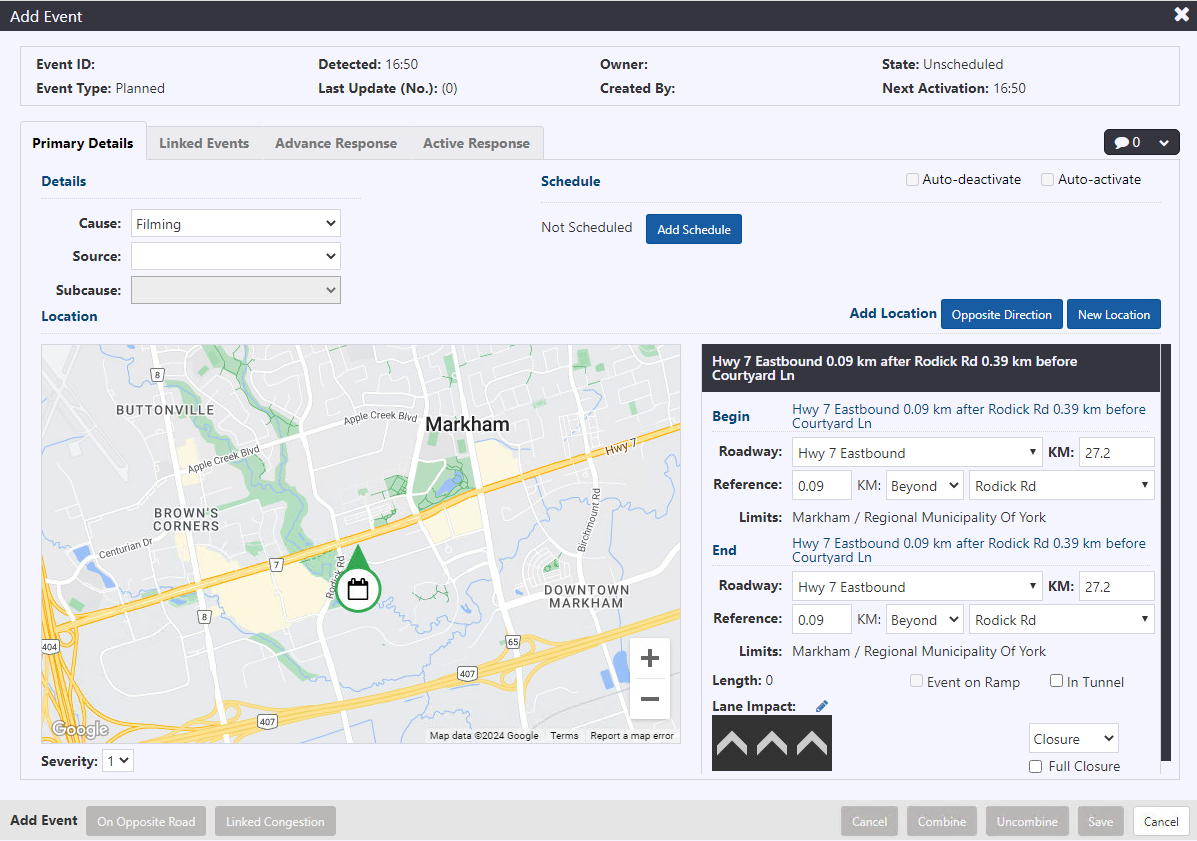
Note: Detected time in the header is the time the event was declared in the ATMS.
Include the following information within the Details area of the Primary Details tab:
- Cause: the specific cause of the Planned event
- Subcause: the specific subcause that is applicable
- Source: the primary source of Planned event information
Next, set location in the Primary Details tab of Event Details, as described in section Set or Change Event Location . Include any comments, if there are any, as described in section Event Comments .
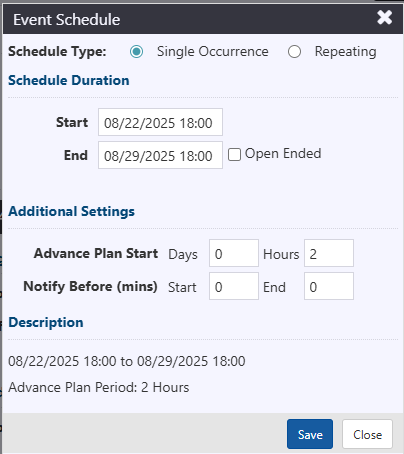
The schedule can be set by clicking Add Schedule button under Primary Details tab. Set the following fields to define the schedule:
- Start: start date and time of the schedule. Clicking in the field will pop open a calendar with time sliders. Select the appropriate date and set the hour/min of the time.
- Open Ended: checking this option will grey out the End and Repeat fields for events with no planned end time.
- End: end date and time of the schedule. Clicking in the field will pop open a calendar with time sliders. Select the appropriate date and set the hour/min of the time.
- Advance Plan Start: there are two fields available, Days and Hours. Type a value in the field representing the time in advance of the planned event activation that an Advance Response plan related to this event be disseminated to devices and other broadcast mediums. If there are no advance warnings, the fields can remain at the default value of 0. For more information see Advance Response .
- Notify Before (mins): indicate the number of minutes prior to be notified of the start or end of a planned event occurrence or Advance Plan activation .
Click the Save button located at the bottom of the Event Details window. The Planned event record will be created. The header of the Event Details window will update to include Event ID, Owner, Update Number and Last Updated time.
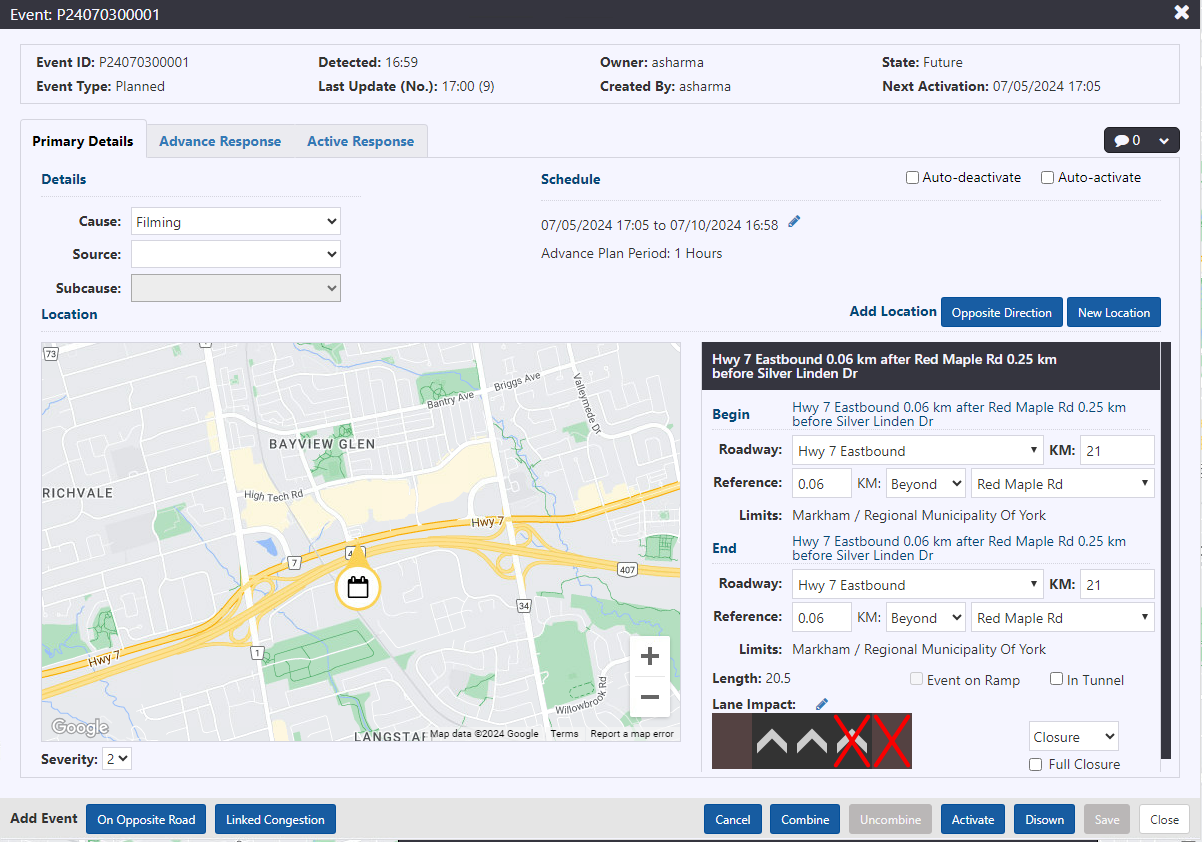
The above information can be populated or updated at any time during the planned event management process.
For managing system suggested Advance and Active response for various devices and broadcast mediums, see section Manage Response Plan .
Set a Repeating Schedule
A repeating Planned event schedule can be set under the Schedule area of the Primary Details tab. Set the following fields to define the schedule:
Start: start date and time of the entire Planned event schedule. Clicking in the field will pop open a calendar with time sliders. Select the appropriate date and set the hour/min of the time.
End: end date and time of the repeating occurrence of the schedule. Clicking in the field will pop open a calendar with time sliders. Select the appropriate date and set the hour/min of the time.
Repeat: select the appropriate repeating pattern. There is ability to select multiple days of the week, e.g., repeat on Tuesdays and Fridays.
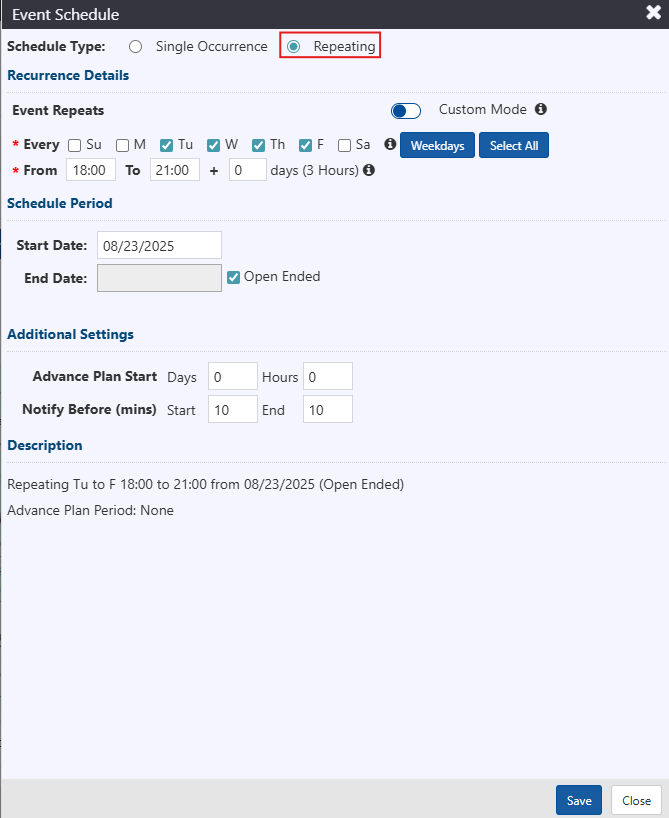
Advance Plan Start: there are two fields available, Days and Hours. Type a value in the field representing the time in advance of the planned event activation that an Advance Response plan related to this event be disseminated to devices and other broadcast mediums. If there are no advance warnings, the fields can remain at the default value of 0. For activating advance warnings, see section Advance Plan .
Notify Before (mins): indicate the number of minutes prior to be notified of the start or end of a planned event occurrence.
:::note
This field does not apply to advance warnings.
:::
Switch to Custom Mode to enter multi-day occurrences and/or to change the scheduled period by day.
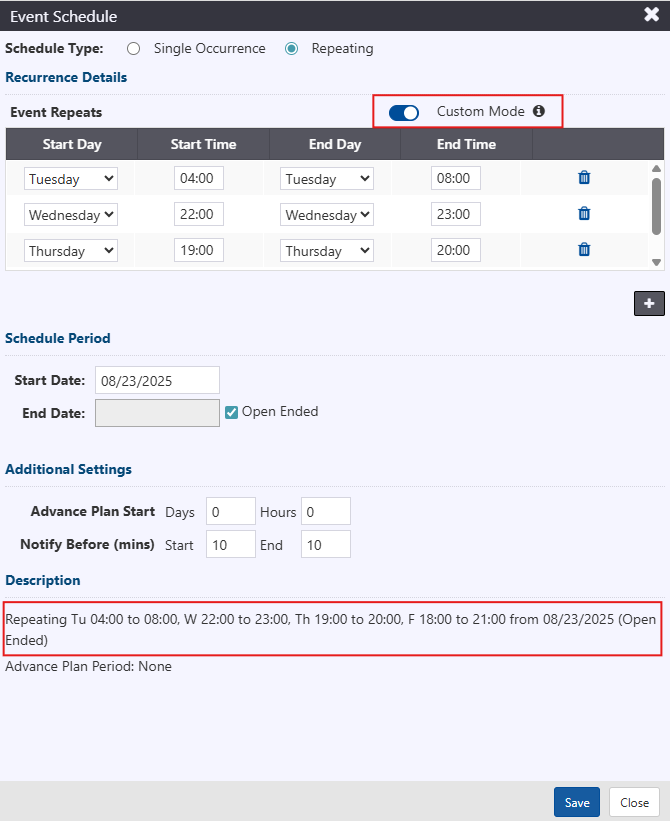
Updating Event and Device schedule
The system will not auto-adjust the end time by same duration as the original schedule when the start time of a schedule is changed if the start time is before end time. If the start time is after the end time, the original duration will be maintained, and end time updated accordingly. This change will be applied to all event and device schedules in the system.
Overlapping Planned Event
When you attempt to save a Planned Event in ATMS that overlaps temporally or spatially with an existing event, a dialog will appear showing the details of the overlapping event(s).
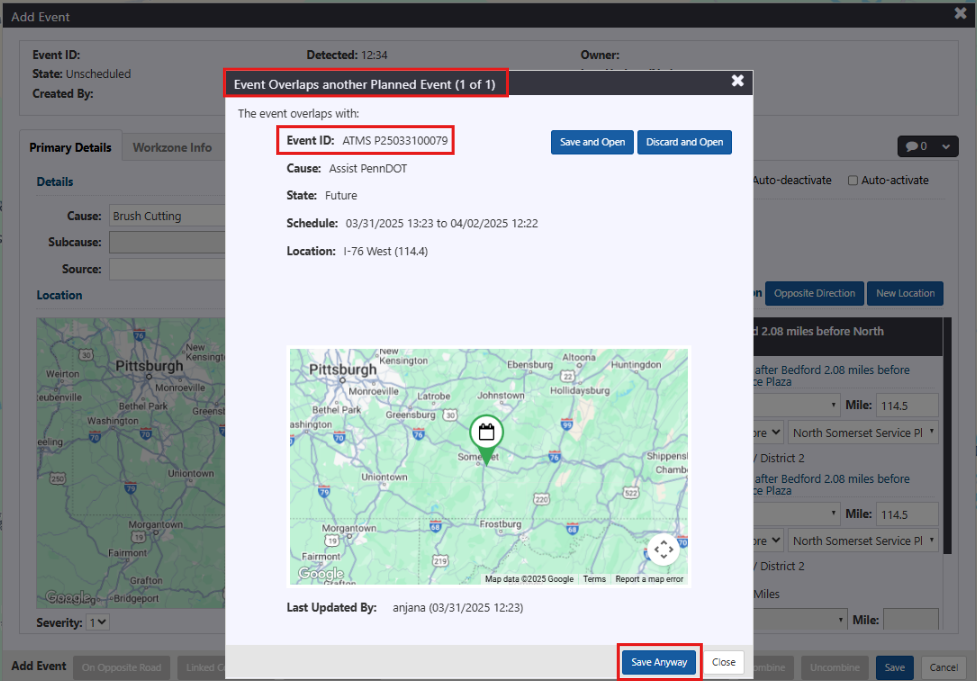
User will have two options:
Save as New Event: The event will be saved with a new, unique Event ID, even if it overlaps.
Discard: Cancels the action and does not save the event.
This allows user to review potential conflicts and proceed as needed.
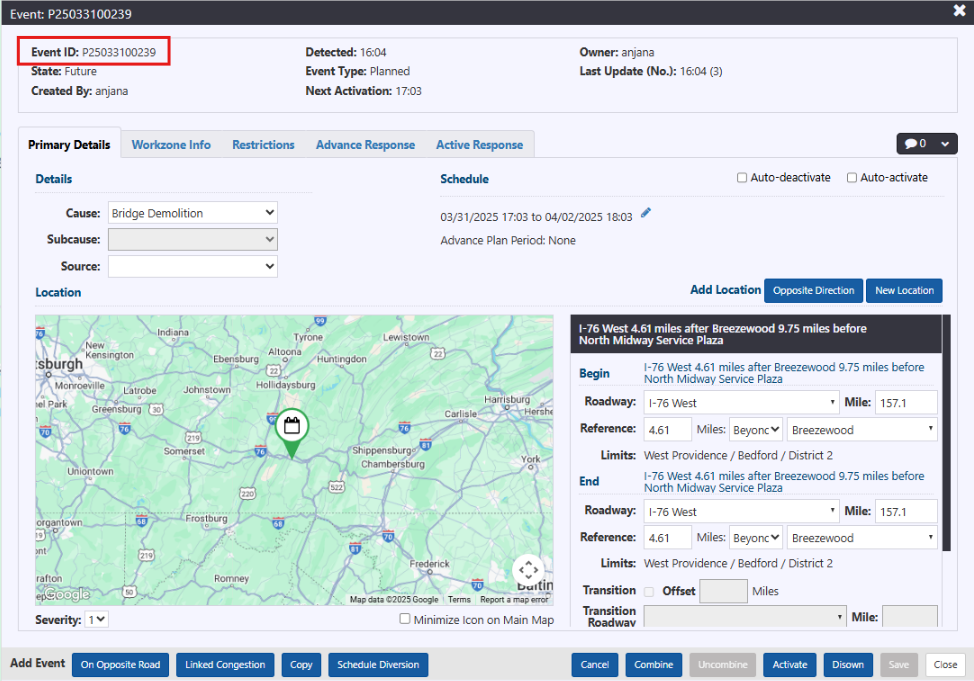
Advance Warning
At the start of the Advance Response period the planned event icon will flash on the map and a medium priority notification will be generated in the notification tray. Advance Response can be accepted by navigating to the Event Details view two ways:
Right-click the event icon and click Details. Event Details window will be shown. Click the Advance Response tab. Advance warning response messages shown.
Click View Plan in the notification. Advance warning response messages in Advance Response tab shown.
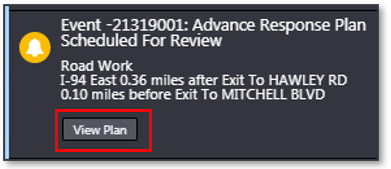
The notification will be removed from the notification tray once all tabs of response are viewed. For accepting the system suggested response, see section Manage Response Plan for more details.
Activate a Planned Event
At the start of the event activation period or within the advance notification period (see Notify Before in section Notify Before ), the planned event icon will flash on the map and a high priority notification will be generated in the notification tray. There are three ways to activate a planned event or planned event repeating occurrence:
- Click Activate in the Event Details window of the planned event. Activate Event confirmation dialogue will appear. Click Continue to activate event.

Response plan will be generated and available for posting, as indicated by a blue banner in the Event Details window and a notification in the notification panel. For more information on response plans, see section Manage Response Plan .
Event icon will change from scheduled to active:

- Navigate to the event icon via the map controls or through event list. Right-click event icon and click Activate.
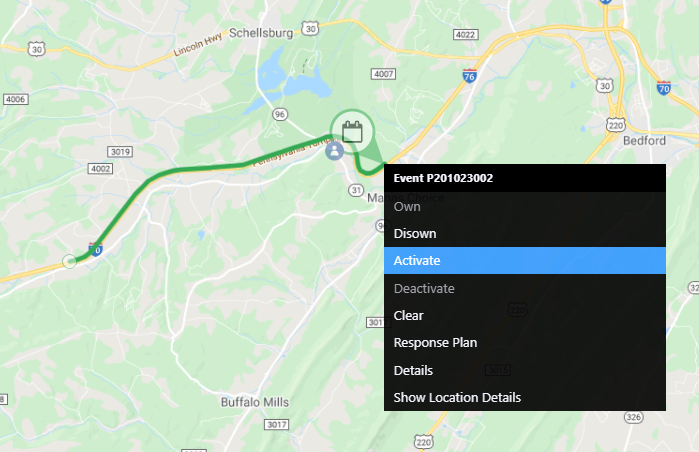
Activate Event confirmation dialogue will appear. Click Continue to activate event.
Response plan will be generated and available for posting, as indicated by a blue banner in the Event Details window and a notification in the notification panel. For more information on response plans, see section Manage Response Plan .
Event icon will change from scheduled to active:

Wait for a notification of the event start in the notification panel:
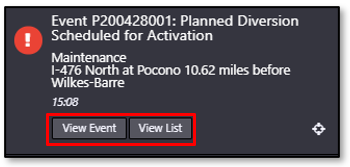
Click View Event to navigate to the Event Details view. Event can be activated through the Event Details window, as stated above.
Click View List to navigate to the event list containing the event. Event Details window can be accessed via the list. For more information on event lists, see section View a List of Events . Event can be activated through the Event Details window, as stated above.
Click
to zoom to the weather event icon on the map. Event can be activated through the Event Details window or right-clicking on the icon, as stated above.
Activate Event confirmation dialogue will appear. Click Continue to activate event. The notification requesting event activation will be removed from the tray.
Active response plan will be generated and available for posting, as indicated by a blue banner in the Event Details window and a notification in the notification panel. For more information on response plans, see section Manage Response Plan .
Event icon will change from active to scheduled if schedule is set to repeat:

The above procedure is applicable for both non-repeating event and repeating planned events.
Note: If Advance Response is disseminated, it will remain until it has been replaced by Active Response. For more information on Advance Response, see section Manage Advance Plan .
For more information on system notifications, see section Notifications.
Deactivate a Planned Event
At the end of the event activation period or within the advance notification period (see Notify Before in section Notify Before ), the planned event icon will flash on the map and a high priority notification will be generated in the notification tray. There are three ways to deactivate a planned event or planned event repeating occurrence:
- Click Deactivate in the Event Details window of the planned event. Deactivate Event confirmation dialogue will appear. Click Continue to deactivate event.

Event icon will change from active to scheduled if schedule is set to repeat:

Event icon will be cleared from the map if schedule is set to No Repeat.
- Navigate to the event icon via the map controls or through event list. Right-click event icon and click Deactivate.
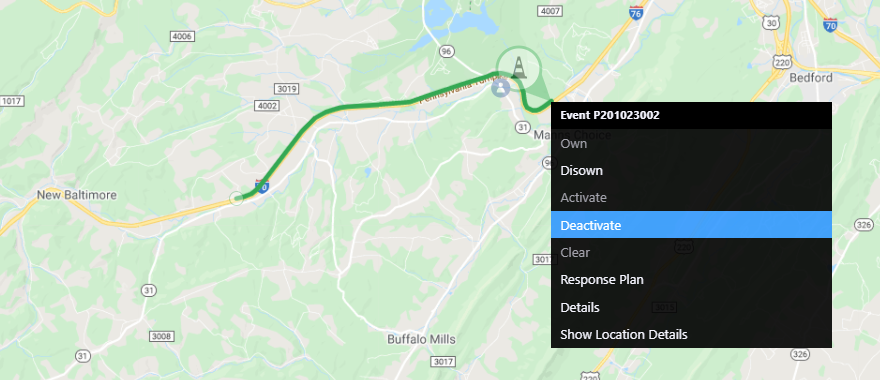
Deactivate Event confirmation dialogue will appear. Click Continue to deactivate event.
Event icon will change from active to scheduled if schedule is set to repeat:

Event icon will be cleared from the map if schedule is set to No Repeat.
View the notification of the event start in the notification panel:
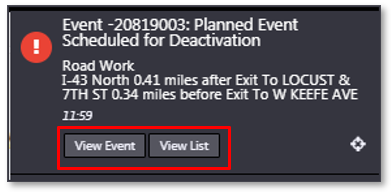
Click View Event to navigate to the Event Details view. Event can be activated through the Event Details window, as stated above.
Click View List to navigate to the event list containing the event. Event Details window can be accessed via the list. For more information on event lists, see section View a List of Events . Event can be activated through the Event Details window, as stated above.
Click
to zoom to the weather event icon on the map. Event can be activated through the Event Details window or right-clicking on the icon, as stated above.
Deactivate Event confirmation dialogue will appear. Click Continue to deactivate event. The notification requesting event deactivation will be removed from the tray.
Event icon will change from active to scheduled if schedule is set to repeat:

Event icon will be cleared from the map if schedule is set to No Repeat.
Deactivating the event will clear the response to devices and there will be no text-based response generated. For more information on response, see section Manage Response Plan .
For more information on system notifications, see section Notifications.
Snooze Notifications
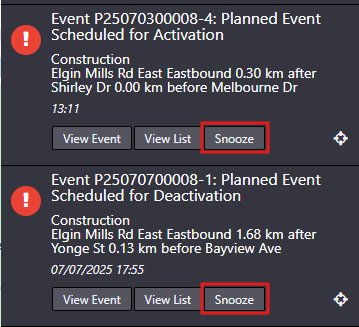
Users can snooze notifications related to the activation or deactivation of a planned event by selecting the Snooze button within the Notification panel.
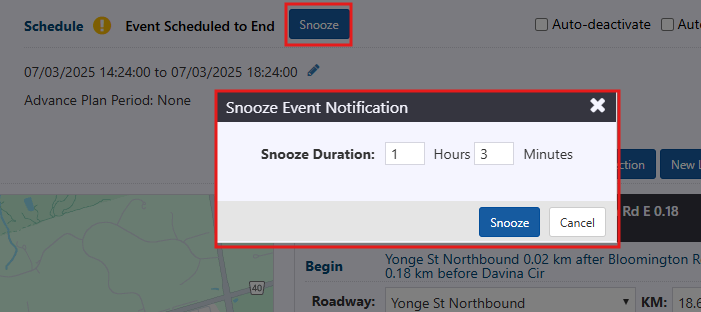
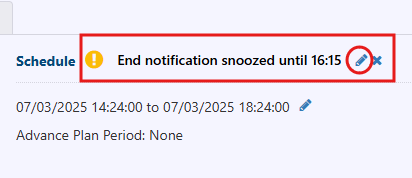
Alternatively, notifications can be snoozed directly from the Event Details view. Users may also modify snooze settings by clicking the icon.
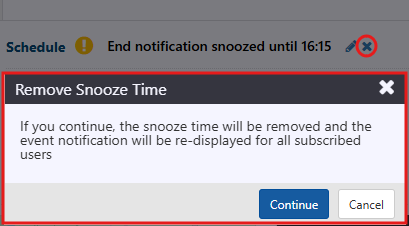
Users can remove the snooze option by clicking the icon in the Event Details view.
Unverifiable Event
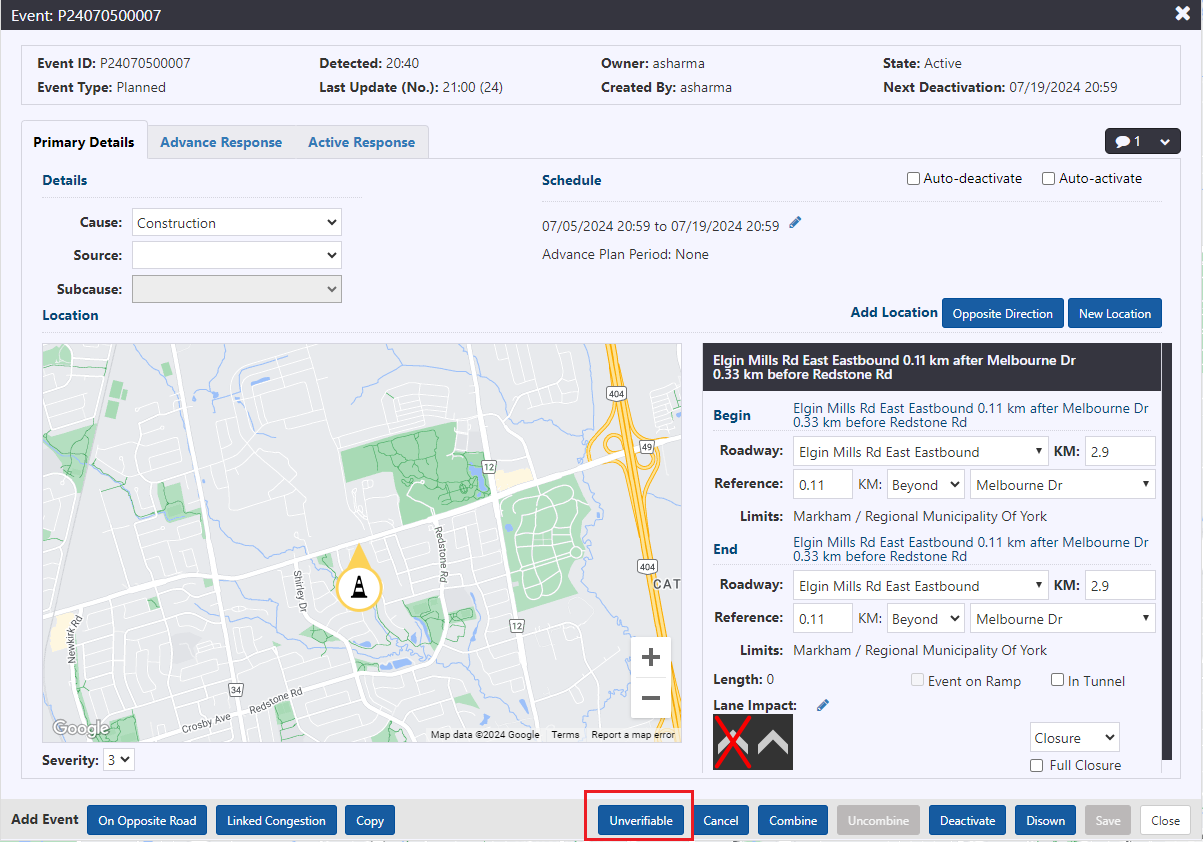
On saving the event, users can make a Planned Event Unverifiable from the map icon, list view and event details view. The ATMS will keep Unverifiable events open in the system but will not notify users at their scheduled start and end times. Events that have been made Unverifiable will be indicated using a question mark badge on the event icon.
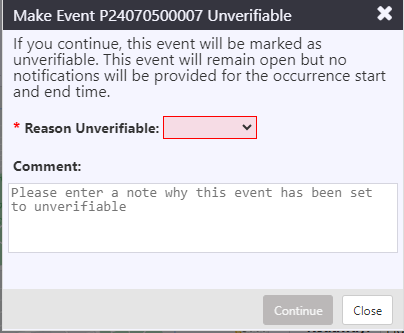
The system prompts user to select a reason the event is being made Unverifiable and enter a comment about the event.
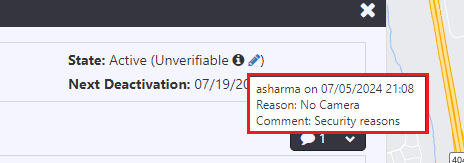
The ATMS records the timestamp at which the event was made Unverifiable, along with the username of the user who changed the event state on hovering info icon.
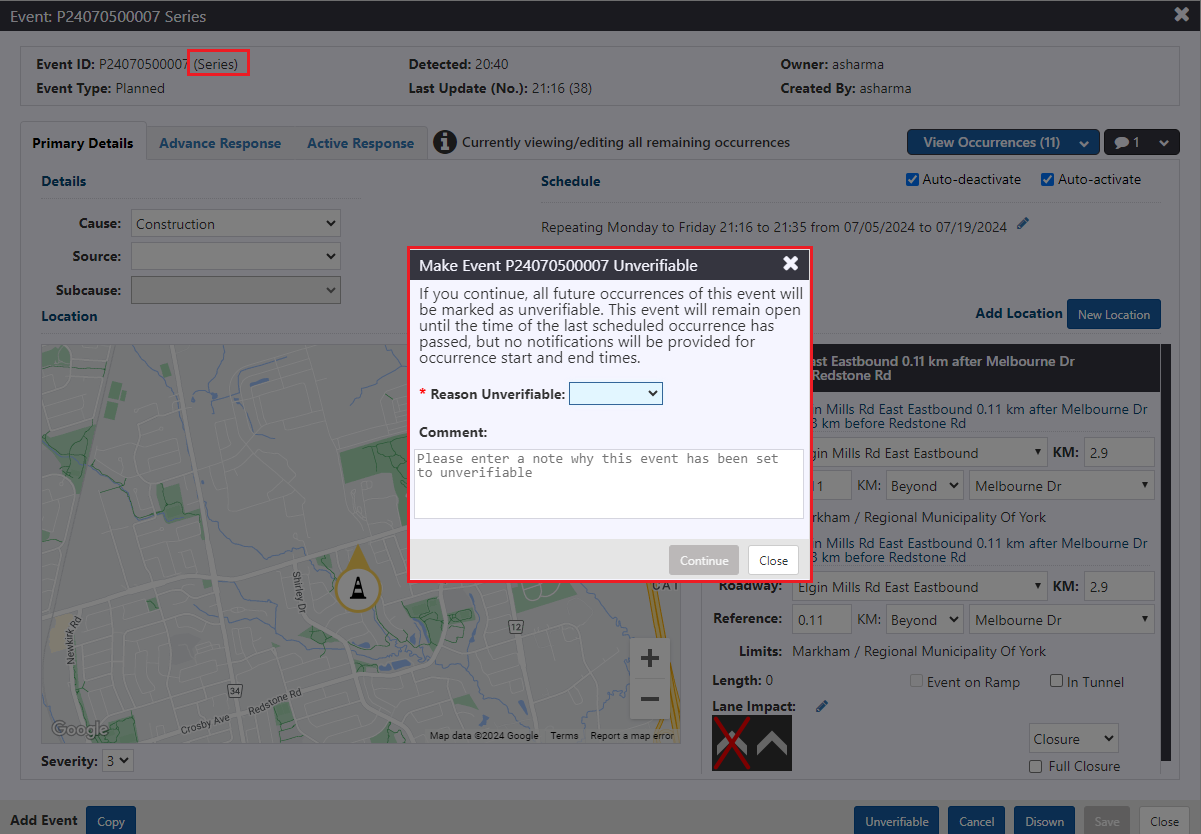
If Series of a recurring planned event is made Unverifiable, all future occurrences of the event will be marked as unverifiable. If a future occurrence is made unverifiable, it will not impact on Series or other occurrences.
Clearing Recurring Events
In the case where a user attempts to clear a recurring planned event that has occurrences remaining, the system will provide the following warning to deter the user:

Cancel Event
Users can cancel a Planned non-recurring event from the map icon, list view and event detail view. Users will be prompted to select a mandatory reason for cancelling the event, along with a comment.
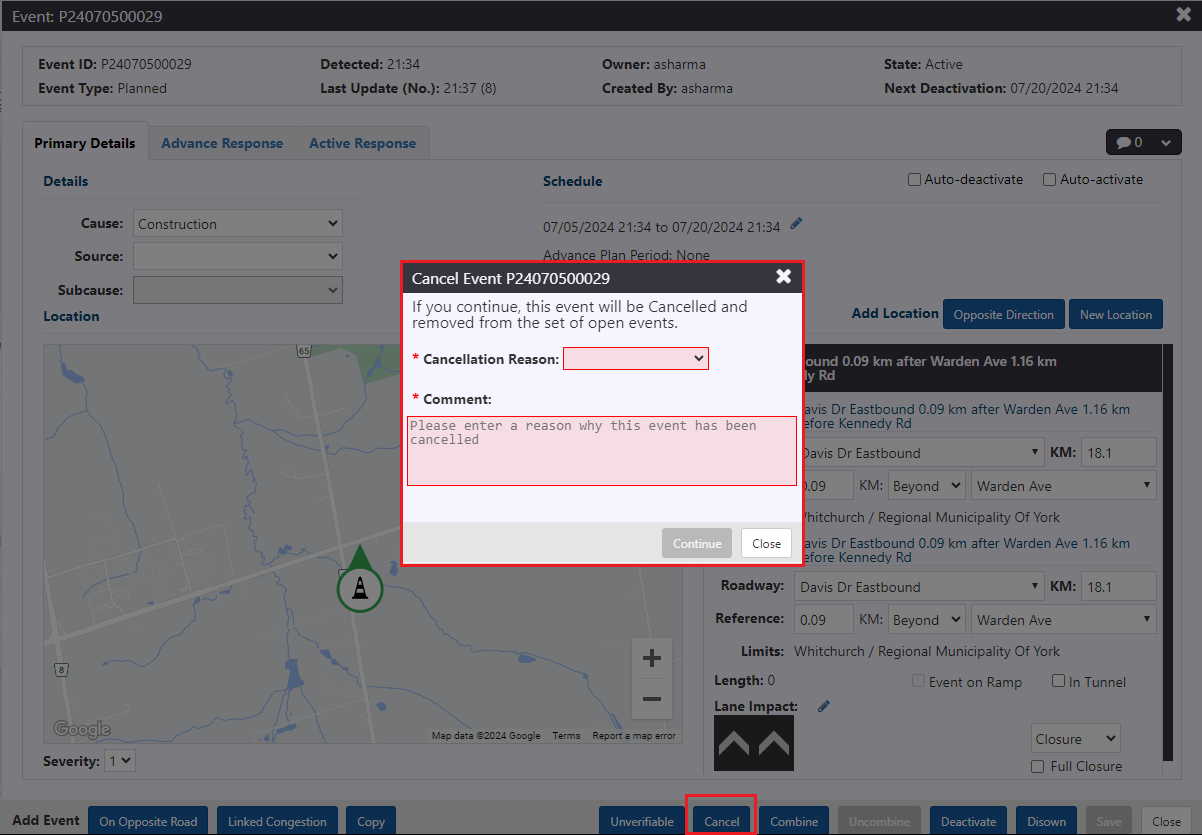
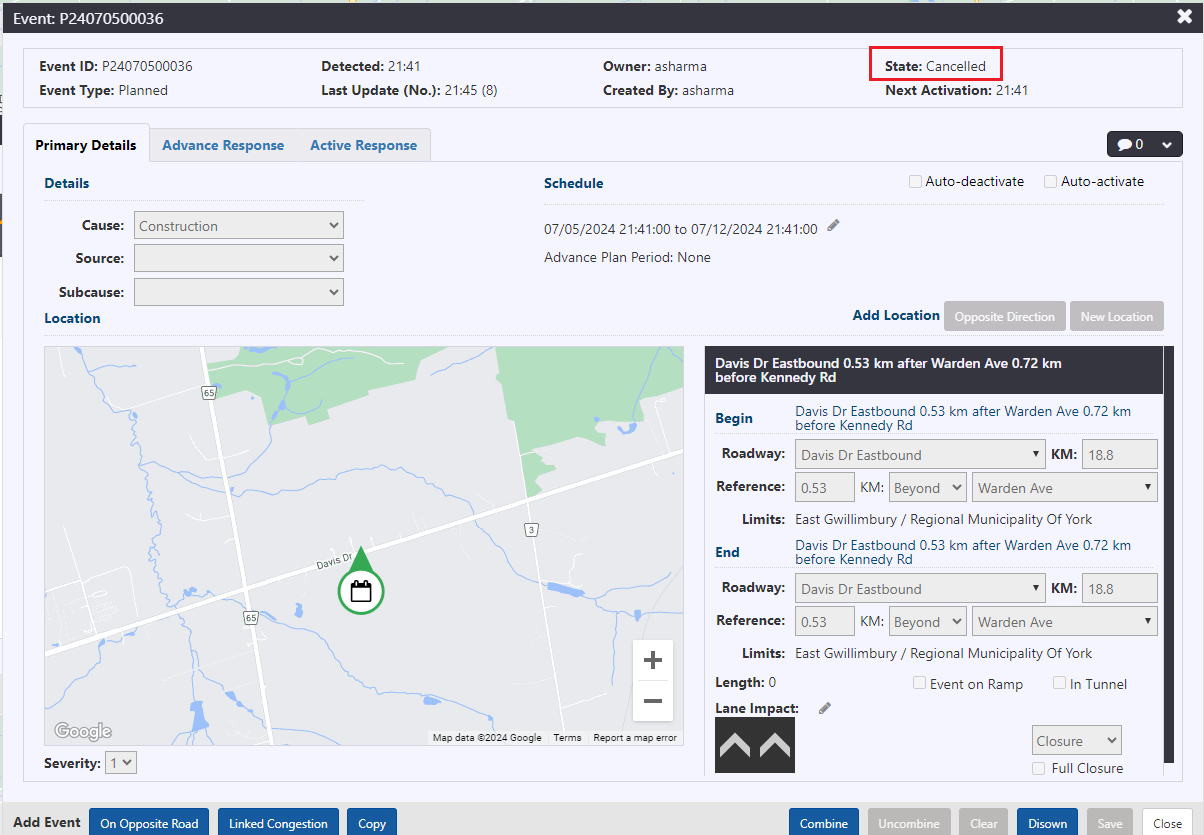
When an event is cancelled, the state moves to cancelled and the event is removed from the set of managed events (removed from map and list, any outstanding notifications removed).
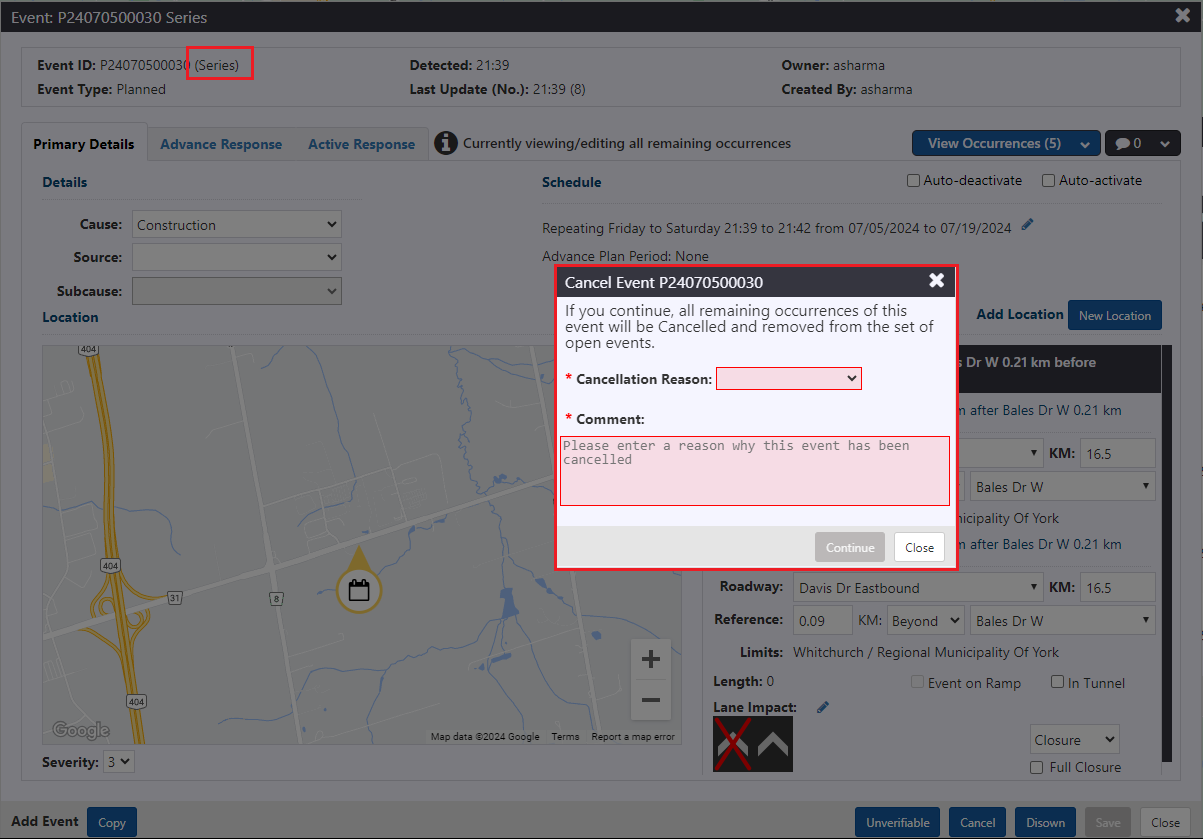
Users can cancel Series and occurrences from map icon, list view and event detail view. If Series is cancelled, all the occurrences will be cancelled in active or future state. Completed occurrences cannot be cancelled. Individual occurrences can be cancelled as well.
Series and Occurrences
Users can create a planned event with a recurring schedule. Upon saving the event, the system creates a Series event. The system assigns a planned event ID to the Series. Users will also be able to view and modify details for the full event series. Changes made to the series will be applied to all future occurrences of the event.
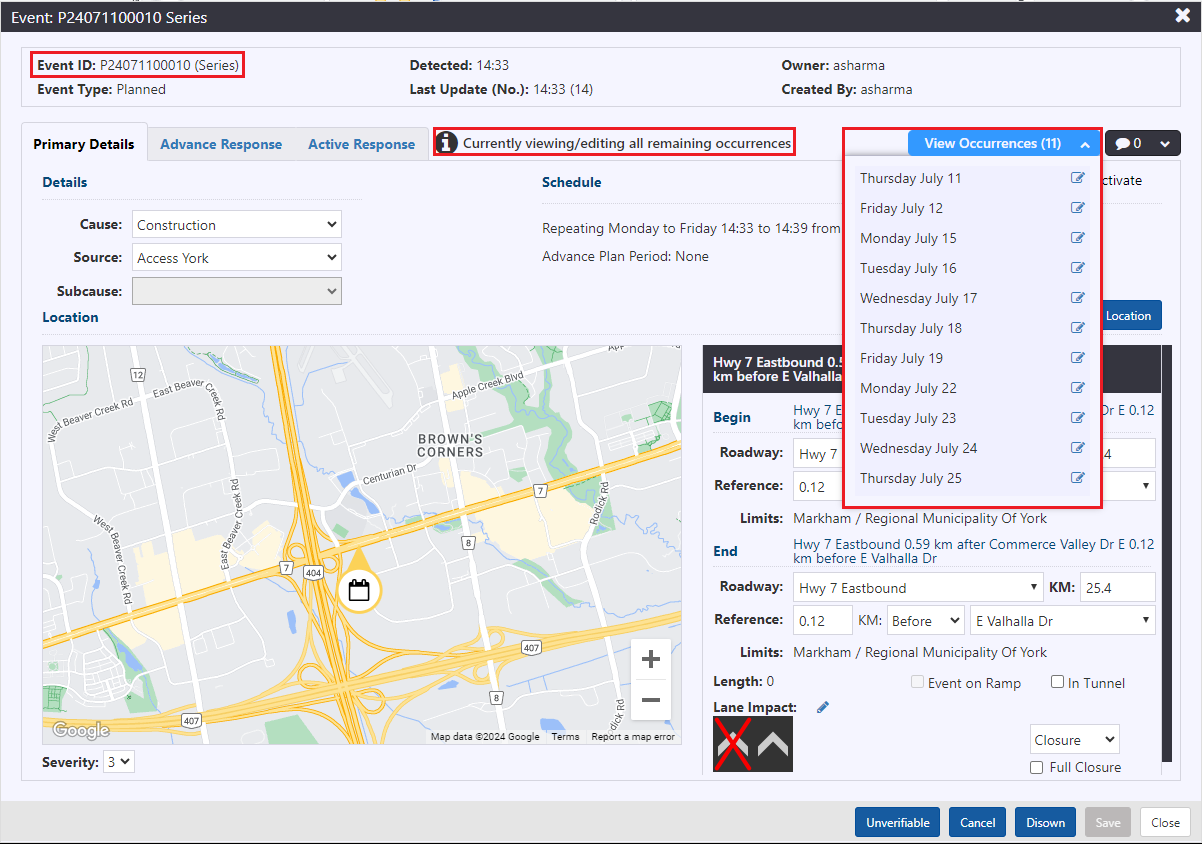
The system creates events for each occurrence of the series using a configured rolling time interval and minimum number of occurrences. Each occurrence of the event will have the same event id, but a unique occurrence number. Users will be able to view and modify the details of individual occurrences. The system should show total remaining occurrences in series details view.
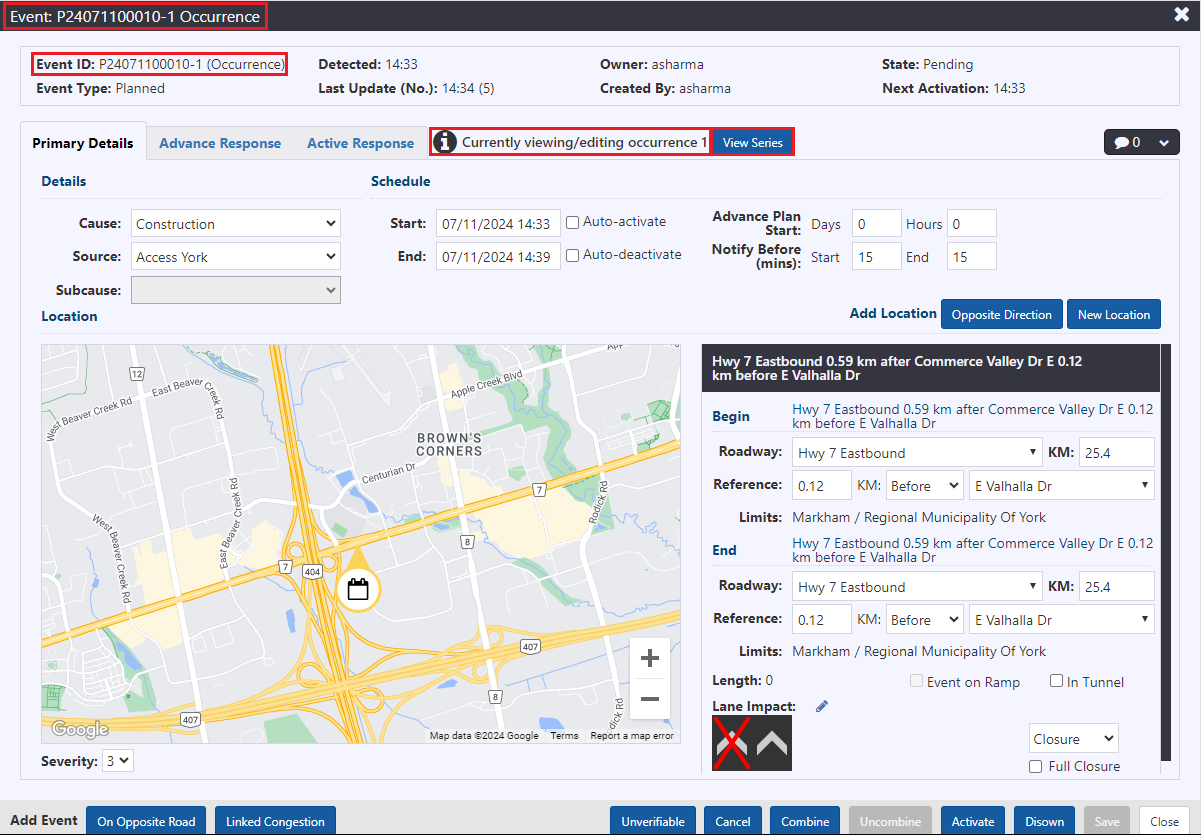
Users should be able to enter a comment when they are making changes to the entire series.
Special Event
To add a Special event, select Special Event from Cause.
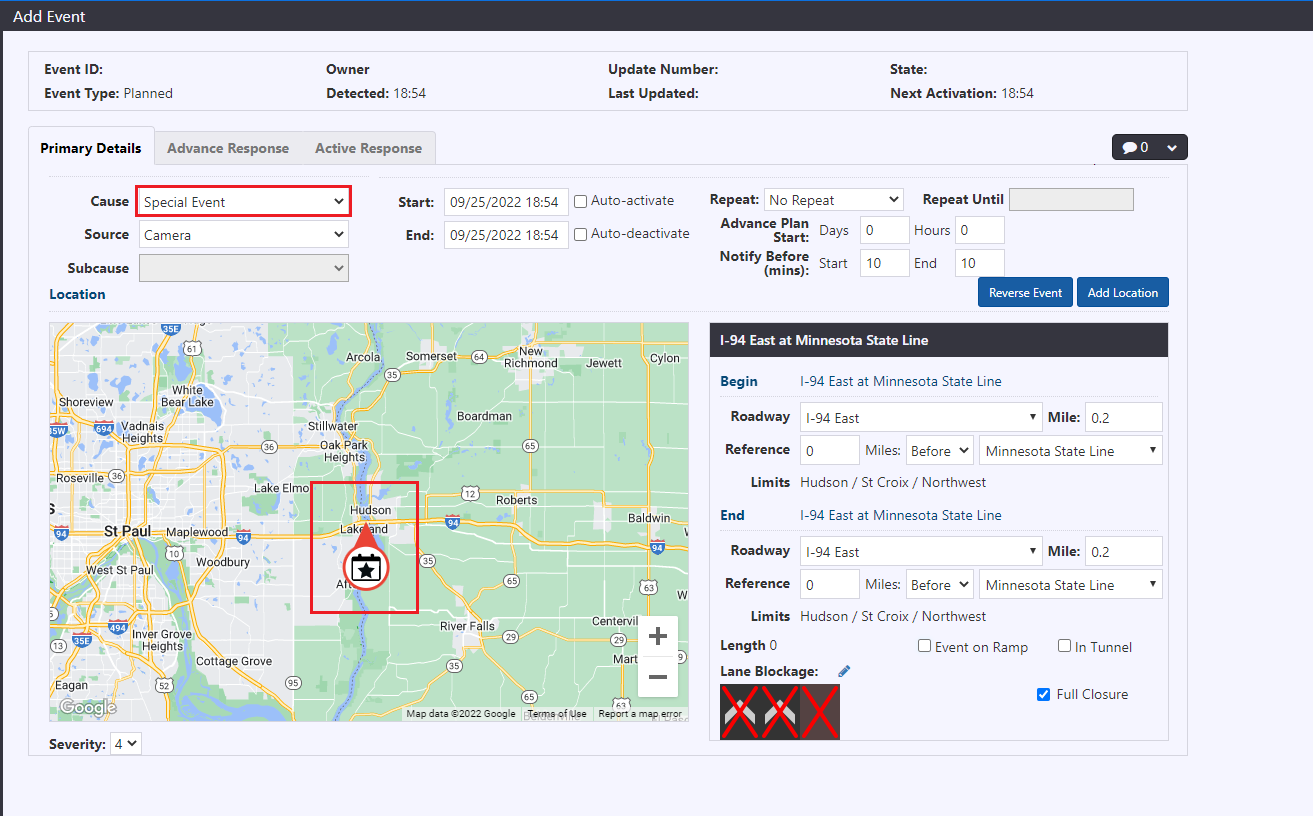
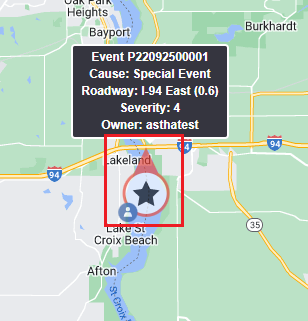
A special event is displayed with a star icon.
Navigate to the ATMS map to locate the added special event.
:::note
Special Event causes are configurable and may vary by deployment.
:::